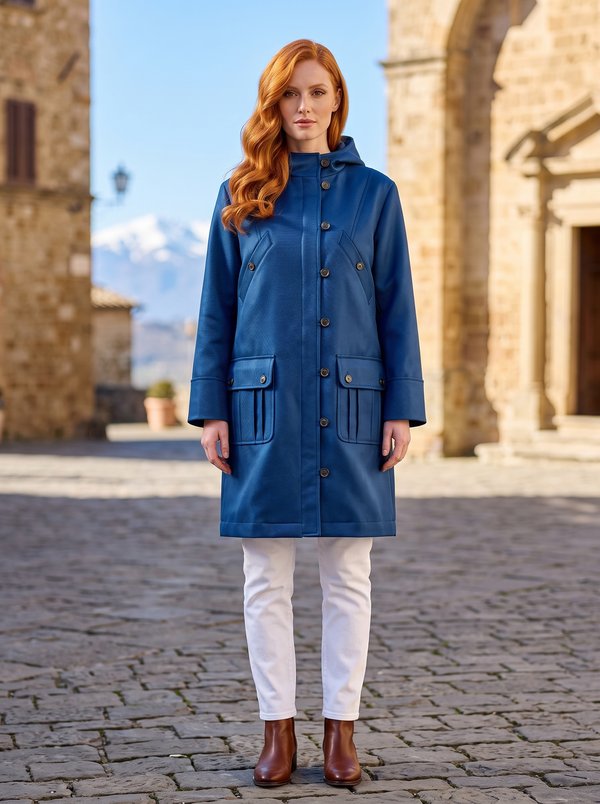
Asymmetric-Zip Coat
A knee-length women's denim coat with an off-centre separating zip from neckline to hem, a lined two-piece hood and three zip pockets: two vertical ones in the front princess seams and one horizontal welt pocket on the front. Fully lined.
When To Wear
- In spring and early autumn over sweaters, shirts and dresses.
- For walks and travel in light rain or wind, with the hood up.
Key Design Features
Silhouette: Straight, shaped with princess seams on the front and back.
Length: About knee length.
Collar: No collar: a two-piece hood with a centre seam, cut in denim and lining, with an interfaced hood facing; its edge is topstitched.
Closure: Asymmetric separating zip set into an interfaced placket on the right front, running from the neckline to the hem. Front edge and neckline topstitched 0.5 cm from the edge.
Sleeves: Long set-in sleeves; the hem is topstitched.
Pockets: Vertical zip pockets left open in the front princess seams, with the teeth showing. A horizontal zip pocket cut into the front above the waist, its opening reinforced with stay tape.
Back: Centre back seam and princess seams.
Finishing: Coat hem topstitched; the lining is turned through an opening in a sleeve lining seam.
Lining: Full lining in the body, sleeves and hood, joined to the interfaced front facings and back neck facing.
Level Of Difficulty
Intermediate. An asymmetric separating zip in a placket, zip pockets in seams and in a slash, a lined hood and a bagged full lining.
Fabric Recommendations
Denim.
Additional Supplies
- Lining fabric
- Fusible interfacing (front facings, back neck facing, hood facing, placket, pocket stay tape)
- 1 separating zip for the front
- 3 zips for the pockets
Cutter's Must
From main fabric:
- Placket – 1 piece
- Center Back – 2 pieces
- Side – 2 pieces
- Right Front – 1 piece
- Left Front – 1 piece
- Right Front Center Facing – 1 piece
- Left Front Center Facing – 1 piece
- Back Neckline Facing – 1 piece
- Hood Facing – 2 pieces
- Hood – 2 pieces
- Sleeve – 2 pieces
From lining fabric:
- Center Back – 2 pieces
- Side – 2 pieces
- Right Front – 1 piece
- Left Front – 1 piece
- Side Pocket Lining – 4 pieces
- Front Pocket Lining – 2 pieces
- Hood – 2 pieces
- Sleeve – 2 pieces
- From fusible interfacing: Right Front Center Facing, Left Front Center Facing, Back Neckline Facing, Hood Facing, Placket; stay tape for the front pocket opening.
Sewing Instructions
- Fuse fusible interfacing to the Right Front Center Facing, Left Front Center Facing, Back Neckline Facing, Hood Facing and Placket.
- Stitch the front princess seams joining the fronts and the Side pieces, leaving the pocket openings unstitched. Press the princess seams open. Place a zip under each opening so that the teeth show and stitch it in. Stitch the Side Pocket Lining pieces to the zip tapes. Stitch the pocket linings together.
- Mark the pocket position on the front. Reinforce the pocket opening with fusible stay tape. Check the pocket position and the opening line. Cut the pocket opening, making diagonal cuts into the corners 1–1.5 cm from each end. Turn the seam allowances through the opening to the wrong side and ease out the edges. Neaten the pocket ends from the wrong side. Place the zip under the edges of the opening so that the teeth show and stitch it in. Stitch the Front Pocket Lining pieces to the zip tapes. Stitch the pocket linings together.
- Stitch the centre seam of the Hood pieces in main fabric, and of the Hood pieces in lining. Stitch the Hood Facing pieces together and stitch the hood lining to the facing. Place the faced lining hood and the main fabric hood right sides together and stitch along the front edge. Trim the seam allowances and turn the hood right side out. Topstitch along the front edge of the hood.
- Fold the Placket in half lengthwise, right sides together, and stitch across the upper and lower ends. Trim the corners and turn the placket right side out. Press the placket. Stitch the right half of the separating zip to the Placket.
- Stitch the back princess seams joining the Center Back and Side pieces and press them. Stitch the centre back seam and press it. Stitch the shoulder seams and press them open. Baste the hood into the neckline.
- Stitch the shoulder seams joining the front facings and the Back Neckline Facing and press them open. Place the prepared placket on the front. Check the order of the layers on the Right Front: front, placket, zip. Stitch the placket to the front. Place the facings on the coat, right sides together, and stitch the lower corner, the front edge and the neckline in one seam. Trim the corners and clip the curves. Turn the front edges right side out, ease out the seams and press. Topstitch along the front edges and neckline 0.5 cm from the edge.
- Stitch the sleeve seams and press them open. Press up the sleeve hem. Set the sleeves into the armholes, matching the notches.
- Stitch the seams of the lining pieces and set in the lining sleeves, leaving an opening in the seam of the right lining sleeve. Press the lining seam allowances. Stitch the lining to the inner edges of the front facings and the Back Neckline Facing.
- Mark and press up the hem of the coat. Stitch the lining to the hems of the sleeves and the coat. Tack the lining to the coat at the seams at waist level. Turn the coat right side out through the opening in the sleeve lining. Stitch the opening closed.
- Topstitch along the coat hem and the sleeve hems.