Professional made-to-measure digital sewing patterns — PDF · PLT · DXF AAMA

Minervainervabeta
#4296
#4298

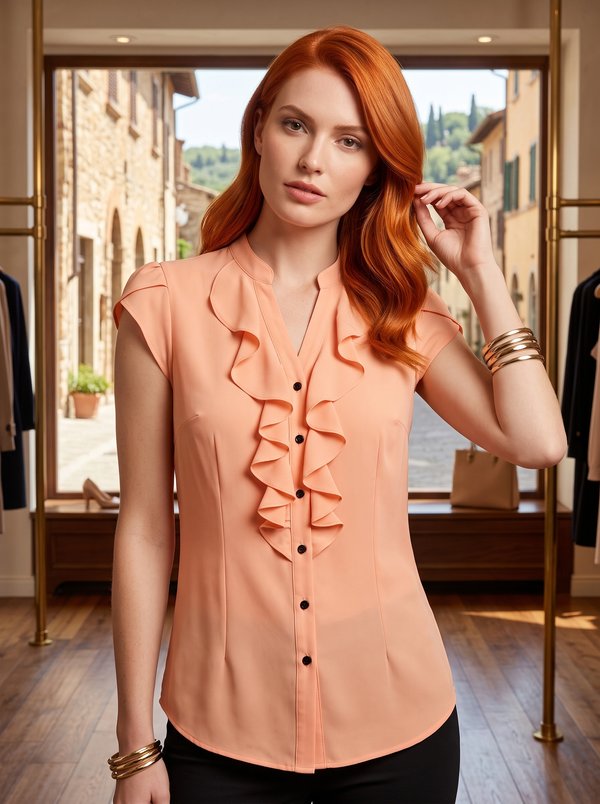
Pleated Flounce Blouse with Collar

Pattern #4297

A sleeveless women's blouse with a high stand collar wrapped at the front by a narrow band, and a pleated jabot that falls from the shoulder yokes to a point below the hem. Closes with a concealed zip in the left side seam and three buttons on loops at the back of the collar. Drafted to your own measurements. Recommended fabric: blouse fabrics of natural or blended fibres.
Tech. Description

Pleated Flounce Blouse with Collar

A sleeveless women's blouse with a high stand collar wrapped at the front by a narrow band, and a pleated jabot that falls from the shoulder yokes to a point below the hem. Closes with a concealed zip in the left side seam and three buttons on loops at the back of the collar.

When To Wear

  • Under a jacket or cardigan for the office.
  • On its own with a pencil skirt or tailored trousers in warm weather.

Key Design Features

Silhouette: Semi-fitted, shaped with darts on the front and back.

Length: Hip length; the jabot ends in a point below the hem.

Collar: Stand collar cut double, folded lengthwise, with three button loops at the back. A narrow folded band wraps the collar at the centre front.

Sleeves: Sleeveless; armholes finished with a folded bias binding turned to the inside and topstitched.

Front: Double shoulder yokes with the front set between them. The jabot is cut on the fold, pleated from the shoulder seam with the pleats turned towards the centre, and topstitched to the front along a marked line.

Closure: Concealed zip in the left side seam; three buttons and loops on the collar.

Back: Two pieces with a centre back seam, open at the top above the mark.

Finishing: Jabot edge bound with bias tape or finished with a narrow rolled hem; garment hem pressed under and topstitched.

Level Of Difficulty

Intermediate. Pleating and placing a large jabot, enclosed yokes, a stand collar with button loops, bias-finished armholes and a concealed side zip.

Fabric Recommendations

Blouse fabrics of natural or blended fibres.

Additional Supplies

  • 3 buttons
  • Concealed zip
  • Bias tape

Cutter's Must

  • From main fabric:
  • Back – 2 pieces
  • Front – 1 piece
  • Flounce – 1 piece with fold
  • Collar – 1 piece
  • Yoke – 4 pieces
  • Trim strip — 1 piece

Sewing Instructions

  1. Stitch darts on the front and back. Press seam allowances towards the center.
  2. Overlock the center edges of the back. Stitch the center edge of the back from the mark to the bottom. Press seam allowance open. Stitch 0.5 cm from the edge of the slit.
  3. Fold the trim strip right sides together and stitch along one of the sides. Turn right side out, centering the seam, and press. Place the trim strip on the front, align edges, and attach the bottom edge of the trim strip to the neckline.
  4. Finish the bottom edge of the flounce with bias binding. (The flounce edges can also be overlocked with a narrow rolled hem.) Create pleats on the flounce starting from the shoulder seam. Direct the pleat tops towards the center. Place the flounce on the front and secure it along the top edge and neckline edge. Topstitch the flounce onto the front along the marked line. Fold the yokes right sides together, inserting the front between them, and stitch. Turn the yokes right side out and press.
  5. Stitch the shoulder seams. Overlock seam allowances and press towards the back.
  6. Process the loop fasteners. Fold the collar in half lengthwise and attach the loop fasteners to the right side. Stitch the short sides, starting and ending the stitch strictly at the marked line. Stitch the outer side of the collar into the neckline. Wrap the collar with the trim strip and attach it to the seam allowance of the inner side of the collar. Fold the seam allowance of the inner side of the collar inwards and topstitch into the seam of the outer side attachment.
  7. Cut bias binding 4 cm wide and a length equal to the armhole length + 4 cm. Fold the trim strip in half lengthwise and press. Place the trim strip on the armhole and stitch. Clip seam allowances. Turn the trim strip to the wrong side and topstitch.
  8. Stitch the right side seam. Overlock seam allowance and press towards the back. Overlock the edges of the left side seam. Stitch the left side seam, leaving an opening for the zipper. Press seam allowances open. Insert the zipper.
  9. Overlock the bottom edge of the garment. Fold the seam allowance to the wrong side, press, and topstitch.
  10. Sew buttons onto the collar.

Order Pattern

Standard Sizes

Individual Measurements

Please double-check the file format and paper size. Your pattern is drafted in exactly the format you select; a different format or paper size later is a new order.

Similar patterns

View all
Support

Minerva Support

Online
Support
Hi! I'm Minerva's AI assistant. What can I help you with?