Professional made-to-measure digital sewing patterns — PDF · PLT · DXF AAMA
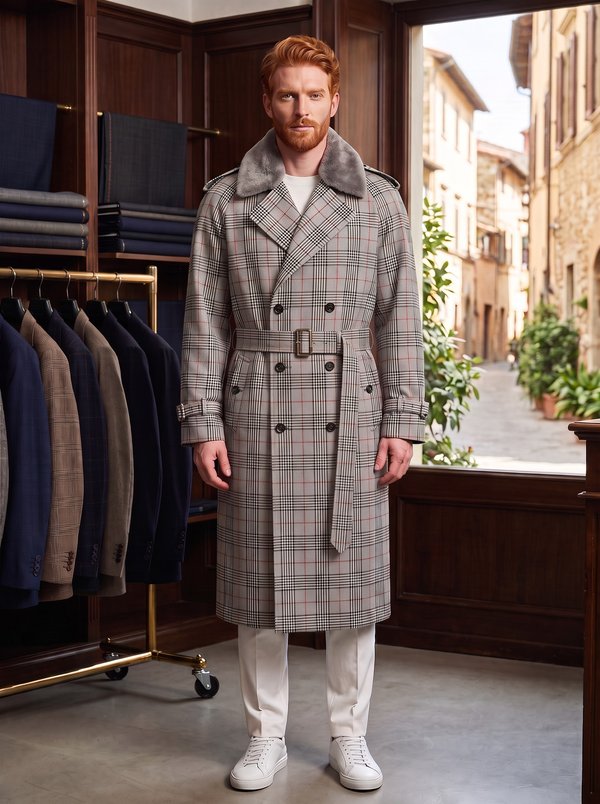
A men's knee-length double-breasted trench coat with raglan sleeves, a storm flap on the right front, a back yoke and a buckled belt. Flapped double-welt pockets, buckled sleeve straps, a back vent with an underlay, double topstitching and a full lining. Drafted to your own measurements. Recommended fabric: raincoat fabric; check lining in beige tones for the body.
A men's knee-length double-breasted trench coat with raglan sleeves, a storm flap on the right front, a back yoke and a buckled belt. Flapped welt pockets, buckled sleeve straps, a back vent with an underlay, double topstitching and a full lining.
Silhouette: Straight, gathered in at the waist by the belt.
Length: Knee length.
Collar: Lapels and a collar on a separate stand; the stand extends into tabs for fastening at the throat. Collar topstitched in a double row 1.3 cm from the edge.
Sleeves: Raglan sleeves of two pieces with a seam over the shoulder, seams topstitched in double rows. Each sleeve has a strap with a buckle and eyelets, threaded through three loops.
Front: Double-breasted, eight buttons in four pairs, buttonholes on the left front; separate front facings. A double-layer storm flap on the right front, buttoned and topstitched 7 mm from the edge.
Pockets: Slanted welt pockets on the fronts, each under a buttoned flap topstitched in a double row.
Back: A faced back yoke with a shaped lower edge; centre back seam ending in a vent closed over an inset underlay, with a buttoned tab.
Waist: Belt with a buckle and eyelets, held by three belt loops.
Finishing: Side seams topstitched along the edge; front edges and lapels topstitched in a double row 1.3 cm from the edge; hems turned and machine-stitched.
Lining: Body lined in check lining, with the back lining cut in one with the yoke; lining 2 cm shorter than the coat.
Advanced. Welt pockets with flaps, raglan sleeves with double topstitching, a collar on a stand with fastening tabs, a vent with an inset underlay, a storm flap, belt and strap hardware.
Raincoat fabric; check lining in beige tones for the body.
From Main Fabric:
From Lining:
For drafting the lining patterns, use the following patterns with the following modifications:
From Fusible Interfacing:
For drafting fusible interfacing patterns, use the following patterns:
Before cutting your fabric:
Apply fusible interfacing to: Center Front Facings, Upper and Lower Collar, Stand Collar (both pieces), Back Vent Insert (only upper piece), Flaps (only upper pieces), Sleeve Decorative Tabs (only half width), Belt (only half), upper Front Yoke piece.
Transfer all markings: pocket placements, button and buttonhole positions, belt loop locations, decorative sleeve tabs (sleeve strap) placement, vent fold lines, collar notch points.
Staystitch neckline and lapel edges on Front pieces to prevent stretching.
Apply interfacing to Pocket Welt Facings and Flaps if not already fused.
Mark pocket opening box on Front pieces. Place Pocket Welt Facing right sides together, stitch rectangle. Cut center and diagonals, turn to inside, press.
Position Pocket Bag behind opening and stitch around the welt rectangle.
Pair Flaps right sides together; stitch sides and bottom. Turn, press, topstitch.
Attach flaps above welt pocket opening, right sides together. Stitch, flip downward, and topstitch along upper seam.
Sew the center-back seam up to the slit and press seam allowances open.
Place the lower yoke facing right sides together with the yoke, stitch, turn right side out, and topstitch 7 mm from the edge.
Place the yoke facing right sides together with the back, matching raw edges; stitch and baste along the armholes.
Sew the side seams; press allowances toward the back and topstitch along the edge.
Sew the sleeve seam and set the sleeves into the armholes; press allowances toward the sleeve and topstitch 1.3 cm — from the hem up to the marking, and along the allowance edge from the marking to the upper sleeve edge.
Sew the shoulder seams and raglan sleeve seams; press allowances toward the back sleeve and topstitch with a double row of stitching.
Place the Center Front Facing onto the Front, right sides together, and stitch along the front edge and lapels (up to the collar). Turn right side out and press.
Press the hem allowance to the inside, turn under the raw edge, and stitch along the fold.
Turn under the long edges of the Belt Loop Strip, stitch along the edge, then cut the sleeve-tab belt-loop strip into 6 pieces and the waist-belt strip into 3 pieces.
Form each belt loop into a ring, place it on the garment at the marked positions, and stitch in place from the inside by sewing back-and-forth at both ends.
Stitch the Back Vent Tab, turn it right side out, and sew a double topstitch along the edge.
Pin the Back Vent Tab —turned outward—to the right side of the left back vent facing (left vent extension).
Sew the lining pieces together in the same sequence as the main garment.
Attach the lining to the front facings, insert it into the coat with the wrong side facing inward, and baste along the edges of the vent and sleeve hem.
Apply fusible interfacing to one collar piece and one stand piece if not already fused.
Place both collar pieces right sides together and stitch around the outer contour.
Turn the collar right side out, press, and work a double decorative topstitch 1.3 cm from the edge.
Place both stand pieces right sides together. Insert the collar between the upper edges of the stand according to the markings, positioning the interfaced stand piece against the interfaced collar piece.
Stitch the collar into the stand, continuing the seam along the extensions that form the fastening tabs.
Turn the collar right side out and press.
Press the stand’s open lower seam allowances to the inside.
With the coat and lining placed right sides together, insert the neckline edge of the collar between the neckline edges of the main garment and the lining, matching the balance marks, and stitch in place; turn the coat right side out.
Topstitch a double row 1.3 cm from the edge along the front edge and lapel; then topstitch along the neckline edge.
Finish the lower edge of the Back Vent Insert the same way as on the main garment.
Stitch the insert to the vent facings and press the seam allowances inward.
Lay the vent closed, aligning its edges with the center line of the insert, and stitch — sewing together the turned-under edges of the insert, the vent facings, and the back piece.
Topstitch the small triangle at the top of the vent to secure the opening.
Hem the sleeve the same way as the back hem.
Sleeve Decorative Tabs:
Stitch the tab pieces right sides together around the outer edges.
Turn right side out and press.
Topstitch two parallel rows (double-stitching).
Install hardware on the tab:
Make the belt in the same manner.
Work buttonholes on:
Sew on the buttons.
Press entire trench coat thoroughly for crisp edges, defined lapels, and smooth seams.
Ready now, no waiting: PDF A0, A4, US Letter, One Page and Projector files with seam allowances, plus the sewing booklet with fabric requirements — in one ZIP.
Body measurements the sizes are drafted for
| Size | Height | Chest | Waist | Hip |
|---|---|---|---|---|
| M | 178 cm70″ | 100 cm39″ | 85 cm33.5″ | 100 cm39″ |
| L | 183 cm72″ | 107 cm42″ | 92 cm36.2″ | 107 cm42″ |
| XL | 188 cm74″ | 112 cm44″ | 99 cm39.0″ | 113 cm44″ |
Prefer a pattern drafted to your own measurements? Order it below.
#6023
Double Breasted Belted Trench Coat

#6021
Double Breasted Peak Lapel Jacket

#6020
Men's Double-Breasted Blazer

#6040
Wide-Leg Cargo Trousers

#6019
Men's Notched Lapel Three Button Jacket

#6018
Classic Men's Three-Button Blazer with Ticket Pocket

#6017
Men's Three-Button Notch Lapel Jacket

#6016
Men's Long Double-Breasted Overcoat

Minerva Support
Online