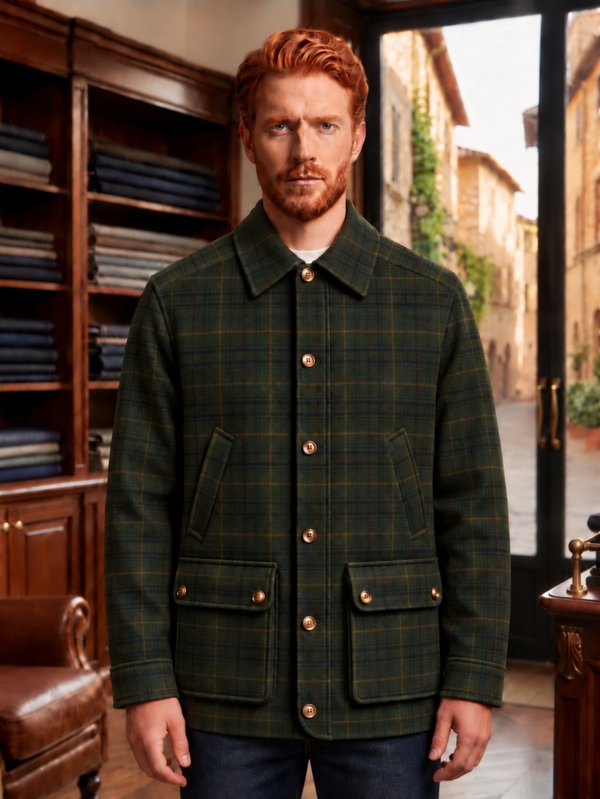
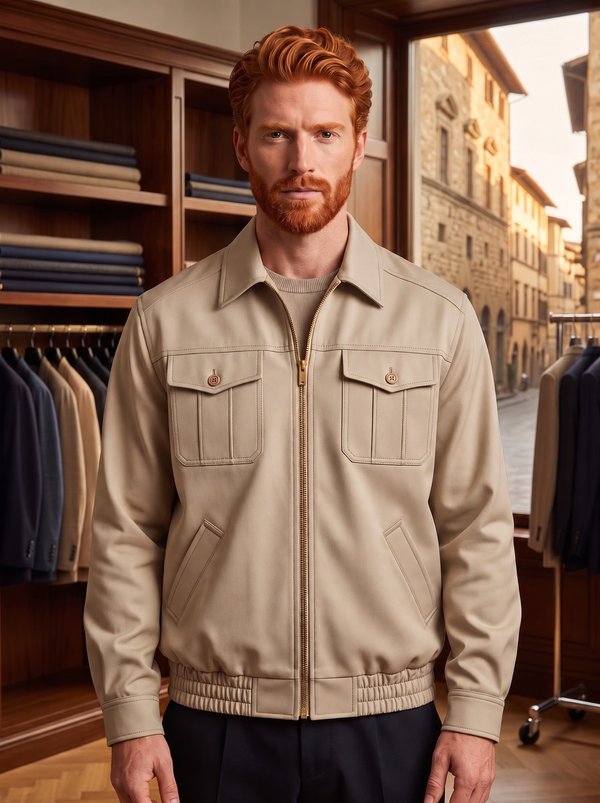
Button-Front Ike Jacket with Pleated Flap Pockets & Elasticated Waistband
A men's waist-length jacket in the Eisenhower style: a shirt collar on a stand, chest patch pockets with tucks and buttoned flaps, and a waistband with elastic at the sides. Unlined, with flat-felled side seams.
When To Wear
- In spring and autumn over a T-shirt, a shirt or a light knit.
- With jeans or chinos for casual wear and outdoor work.
Key Design Features
Silhouette: Roomy body gathered into a fitted waistband.
Length: Waist length.
Collar: Shirt collar on a separate stand, buttoned at the stand; collar and stand topstitched 5 mm.
Sleeves: Two-piece set-in sleeves, topstitched at the armhole, with a faced slit, pleats at the hem and a one-button cuff.
Front: Separate left and right fronts with cut-on, topstitched closures; five buttons on the body and two on the waistband.
Pockets: Patch pockets on the chest with two vertical tucks topstitched 3 mm from the folds; flaps with a point at the centre, closed with one button each.
Back: One piece cut on the fold under a double yoke; the yoke continues onto the front shoulders.
Waist: Front and back waistband sections with elastic in stitched casings at the sides; four belt loops.
Finishing: Side and underarm seams sewn in one pass as a flat-felled seam with double topstitching; fusible interfacing on the collar, stand and cuffs.
Lining: Unlined.
Level Of Difficulty
Intermediate. A collar on a stand, faced sleeve slits, cuffs, flat-felled seams, an enclosed double yoke and an elasticated waistband with casings.
Fabric Recommendations
Dense cotton fabrics such as denim; the sample is made in cotton gabardine.
Additional Supplies
- Fusible interfacing, 35 cm of 140 cm width
- Elastic tape for the waistband
- 12 buttons, 10 mm (front, collar stand, pocket flaps and cuffs)
Cutter’s Must
From Main Fabric:
- Back – 1 piece on fold
- Left Front – 1 piece
- Right Front – 1 piece
- Yoke – 2 pieces
- Upper Sleeve – 2 pieces
- Lower Sleeve – 2 pieces
- Collar – 2 pieces
- Stand Collar – 2 pieces
- Patch Pocket – 2 pieces
- Patch Pocket Flap – 4 pieces
- Sleeve Facing – 2 pieces
- Cuff – 4 pieces
- Back Waistband – 1 piece
- Front Waistband – 1 piece
- Belt-Loop – 1 piece (cut into 4 loops after sewing)
From Fusible Interfacing:
- Collar – 1 piece
- Stand Collar – 1 piece
- Cuff – 2 pieces
Important Information
Before cutting your fabric:
- Print and lay out pattern pieces to determine yardage.
- Check mirrored pieces, notches, and grainlines.
- For patterned fabrics, align carefully for symmetry.
Topstitching is 5 mm from the edge or seam unless stated otherwise.
Assembly Instructions
1. Preparation – Fuse Interfacing
From the wrong side, apply fusible interfacing to the outer Collar, the outer Stand Collar and the two outer Cuffs. Press with a hot iron and press cloth until fully bonded.
2. Front Edges
- Press the front closure allowance of each Front to the wrong side along the fold line and baste along the fold.
- Stitch along the front edge line.
3. Pleated Patch Pockets and Flaps
- Form the pleats on each Patch Pocket following the markings; press and topstitch 3 mm from the folds.
- Press the top hem of the pocket to the inside, turn the raw edge under and stitch along the edge.
- Press the remaining edges under, position the pocket on the Front by the markings and edgestitch in place.
- Place an interfaced and a plain Flap right sides together; stitch around the outer edges, trim, turn, press and topstitch.
- Place each flap on the Front above the pocket, right side down and pointing upwards, with its raw edge on the flap marking; stitch 1 cm from the raw edge.
- Fold the flap down over the pocket, press and topstitch 5 mm from the fold to enclose the seam allowance.
4. Yoke
- Place the two Yokes right sides together with the Back between them, matching the edges, and stitch. Turn, press and topstitch.
- Attach the Fronts to the front edges of the yoke in the same way, matching the notches and sandwiching the Fronts between the two yokes.
5. Collar on a Stand
- Place the two Collar pieces right sides together; stitch the outer edges, trim, turn, press and topstitch.
- Place the two Stand Collars right sides together with the collar between them along the upper edges (interfaced stand against interfaced collar) and stitch, continuing the seam along the front extensions of the stand.
- Turn the stand, press its open edges under, insert the neckline between them and edgestitch, continuing the topstitching along the upper stand seam.
6. Sleeves and Slits
- Stitch the Upper Sleeve and Lower Sleeve together up to the slit marking; overlock and press the allowances towards the upper sleeve. Below the marking press the allowances open.
- Pin the Sleeve Facing right side to the wrong side of the sleeve by the markings and stitch along the edge. Finish the open edge with a narrow machine-stitched hem.
- Clip the allowances at the top of the slit and turn half the width of the facing to the right side. Turn its raw edges under and edgestitch to the sleeve.
- Set the sleeves into the armholes flat, matching the notches; overlock, press the allowances towards the body and topstitch.
7. Side and Sleeve Seams (Flat-Felled)
- Place the jacket right sides together and stitch the side and underarm seams in one continuous seam.
- Press the allowances towards the front, trim the lower allowance to half its width, fold the upper allowance over it and stitch to the garment with double topstitching.
8. Cuffs
- Form the pleats at the sleeve hem by the markings, press and baste.
- Place an interfaced and a plain Cuff right sides together; stitch the short ends and one long edge, then turn.
- Stitch the interfaced cuff to the sleeve hem, right sides together. Press the open edge under and topstitch along the seam, continuing the topstitching around the whole cuff.
9. Waistband and Belt Loops
- Join the Back Waistband and Front Waistband at the short ends; press the seams open.
- Stitch the waistband to the lower edge of the jacket, right sides together.
- Fold the waistband to the inside, press the open edge under and stitch the horizontal casing lines by the markings.
- Insert elastic into the casings and secure with vertical stitching at the markings.
- Topstitch the open edge of the waistband to the jacket, continuing the topstitching around the whole waistband.
- Fold the Belt-Loop strip in half lengthwise right sides together, stitch the long edge, turn, press and topstitch both edges. Cut into 4 loops, turn the ends under and stitch to the waistband by the markings.
10. Finishing
- Make buttonholes on the left front, collar stand, pocket flaps and cuffs by the markings.
- Sew on the buttons.
- Give the jacket a final press.