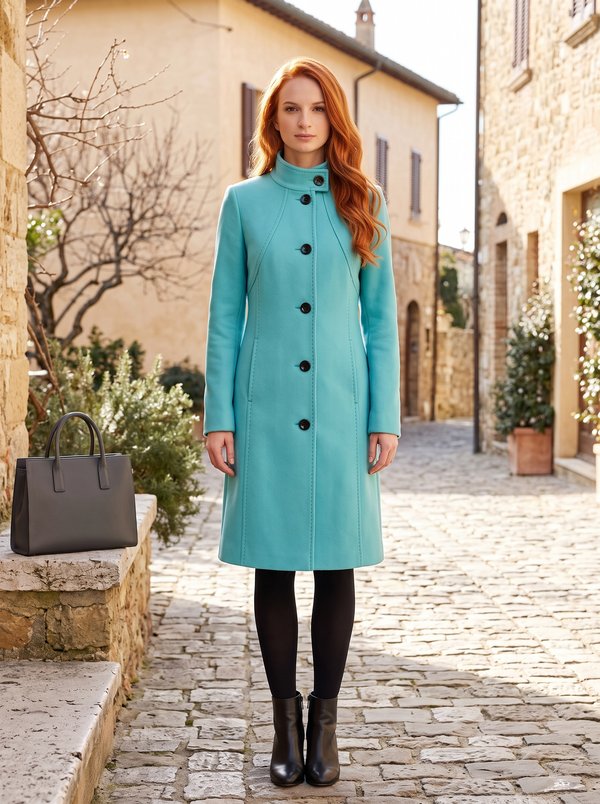
Tailored Collared Coat
A women's single-breasted coat above knee length with a waist seam, a rounded collar on a stand and six buttons. Piping trims the collar, front edges, flaps and sleeve tabs; the back has an inverted pleat below the waist seam. Fully lined.
When To Wear
- In autumn and early spring over dresses, skirts or trousers.
- For town and the office, where the piped trim and buttons can be seen.
Key Design Features
Silhouette: Fitted at the waist by a horizontal waist seam, with princess seams on the upper front and a pleat in each lower front, depth turned toward the side.
Length: Above the knee.
Collar: Rounded collar on a separate stand, edged with piping along the outer and side edges.
Sleeves: Two-piece set-in sleeves with an eased cap; a piped tab on the upper sleeve near the hem, caught into the sleeve seams.
Closure: Single-breasted, six buttons; buttonholes on the right front. The front edges are piped.
Pockets: None; piped decorative flaps are set into the waist seam on both fronts.
Back: Upper back with a centre seam and darts; lower back cut on the fold with an inverted pleat at the centre, topstitched 1 cm from both folds through the hem.
Finishing: Shoulder pads and sleeve heads; interfaced fronts, collar, facings, flaps, tabs, armholes and hems.
Lining: Full lining cut from the main pieces minus the facings, with lined flaps.
Level Of Difficulty
Advanced. Piping inserted into four edges, a collar on a stand attached separately to the coat and to the facings, two-piece sleeves with shoulder pads, pleats and a full bagged lining.
Fabric Recommendations
Coating fabrics of natural or blended fibres.
Additional Supplies
- Lining fabric
- Fusible interfacing
- 6 buttons
- Piping with cord (approximate length is marked on the lower front pattern piece)
- Shoulder pads
- Sleeve heads
Cutter's Must
From main fabric:
- Upper back – 2 pieces
- Lower back – 1 piece on fold
- Center upper front – 2 pieces
- Side upper front – 2 pieces
- Lower front — 2 pieces
- Back neckline facing – 1 piece
- Front facing – 2 pieces
- Upper sleeve – 2 pieces
- Lower sleeve – 2 pieces
- Sleeve tab — 4 pieces
- Collar – 2 pieces
- Collar stand – 2 pieces
- Flap – 2 pieces
From lining fabric:
- Upper back – 2 pieces
- Lower back – 1 piece on fold
- Center upper front – 2 pieces
- Side upper front – 2 pieces
- Lower front — 2 pieces
- Upper sleeve – 2 pieces
- Lower sleeve – 2 pieces
- Flap – 2 pieces
Attention: lining pieces are cut with the front facing and neckline facing deducted.
From fusible interfacing: center front, upper collar, inner collar stand, front facing, back neckline facing, outer flap, sleeve tab, armhole areas and hem seam allowances.
Sewing Instructions
- Fuse fusible interfacing to the designated pieces.
- Place flap pieces right sides together and stitch along the outer contour, inserting piping. Clip seam allowances at curves, turn pieces right side out and press.
- Stitch darts on the upper back. Press darts towards the center back. On the lower back, create and secure the inverted pleat according to markings. Attach the lower back to the upper back. Press seam allowances upwards.
- Stitch the princess seams of the front. Press seam allowances towards the center front. On the lower front, create a pleat according to markings. Direct the pleat depth towards the side. Attach the lower front to the upper front, inserting the flap between the pieces. Press seam allowances upwards.
- Stitch side and shoulder seams. Press seam allowances open.
- Attach the upper collar to the collar stand, attach the lower collar to the collar stand. Press seam allowances open.
- Place collar pieces right sides together and stitch along the outer edge and side edges, inserting piping. Start and end the seam strictly at the marked collar stand attachment line. Turn the collar right side out and press.
- Stitch and press open the shoulder seams of the back neckline facing and front facing. Press seam allowances open.
- Press up the hem allowance. Place the front facing on the right side of the front, right side down, pin and stitch along the front edge, inserting piping. Stitch upwards to the notch indicating the end of the collar attachment. Trim the seam allowances of the upper front edge corners. Turn the front edges right side out, straighten the seams.
- Attach the upper collar to the neckline of the main garment, and the lower collar to the neckline of the back facing and front facing. Press seam allowances open. Secure the collar attachment seam allowances close to the seams.
- Fold sleeve tabs in pairs right sides together and stitch along the long sides, inserting piping. Place the tab on the right side of the upper sleeve and secure along the seams. Stitch and press open the elbow seam of the sleeve. Stitch and press open the front seam of the sleeve. Attach sleeves to the armhole, easing the sleeve at the top of the cap and aligning notches. Insert shoulder pads and sleeve heads.
- Stitch lining pieces similarly to the main garment pieces, leaving an opening in the left front sleeve seam. Attach the lining to the inner edges of the front facings and the back neckline facing. Stitch the lower corner of the front edge. Stitch the lining to the garment hem.
- Attach the lining to the bottom of the sleeves. Turn the coat right side out. Close the technological opening.
- On the right front, make buttonholes; on the left front, sew on buttons.
- On the back, along the outer and inner fold edges, topstitch 1 cm from the fold, catching the hem allowance.