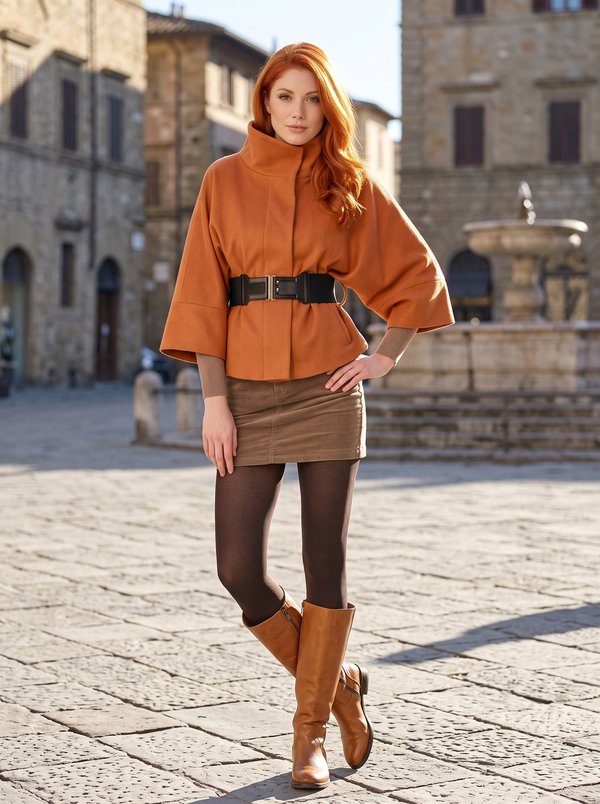
Fitted Belted Coat with Stand Collar
A fitted women's coat to above the knee with a stand collar cut in one with the fronts and back, an asymmetric front edge closing with two buttons on loops, princess seams with in-seam pockets and a buckled belt. Bands of parallel topstitching trim the front edge, hem, collar and cuffs. Fully lined.
When To Wear
- In autumn and spring over dresses, skirts or trousers.
- Belted at the waist for city wear and for the office.
Key Design Features
Silhouette: Fitted through the waist with princess seams and darts front and back, flaring slightly to the hem.
Length: Above the knee.
Collar: Stand collar cut in one with the fronts and back, joined at the shoulder seams and faced by the front facings and back neck facing.
Sleeves: Set-in one-piece sleeves with a folded cuff decorated with 13 rows of topstitching; shoulder pads.
Closure: Asymmetric front edge off centre, fastened with 2 buttons and button loops set into the front edge seam.
Pockets: In-seam pockets in the front princess seams.
Back: Centre back seam, princess seams and darts.
Waist: Belt with a buckle and 4 rows of topstitching, held by two belt loops at the side seams.
Finishing: 6 parallel rows of topstitching along the front edge, the hem and the top edge of the collar; 3.5 cm hem allowance.
Lining: Full lining, sleeves included, attached to the facings, cuffs and hem.
Level Of Difficulty
Advanced. A cut-on stand collar joined with the facings, in-seam pockets in princess seams, button loops set into the edge, bagged lining and many rows of evenly spaced topstitching.
Fabric Recommendations
Coating fabrics of natural or blended fibres.
Additional Supplies
- Lining fabric
- Fusible interfacing (centre fronts, front facings, back neck facing, back armholes, pocket openings, hem)
- Belt buckle
- 2 buttons
- Shoulder pads
Cutter's Must
- From main fabric:
- 1. Back (center) – 2 pieces
- 2. Back (side) – 2 pieces
- 3. Front (center) – 2 pieces
- 4. Front (side) – 2 pieces
- 5. Sleeve – 2 pieces
- 6. Cuff – 2 pieces
- 7. Back neck facing – 2 pieces
- 8. Front Facing – 2 pieces
- 9. Belt — 1 piece
- 10. Belt Loops — 1 piece
- From lining fabric:
- 1. Back (center) – 2 pieces
- 2. Front (center) – 2 pieces
- 3. Back (side) – 2 pieces
- 4. Front (side) – 2 pieces
- 5. Sleeve – 2 pieces
- 6. Pocket Bag — 4 pieces
- From fusible interfacing:
- 1. Front (center) — 2 pieces
- 2. Front Facing — 2 pieces
- 3. Back neck facing — 2 pieces
- Also, interface the armhole areas on the back, pocket opening, and hem of the garment.
Sewing Instructions
- Interface the pattern pieces with fusible interfacing.
- On the back, stitch the darts. Press the dart folds towards the center. On the back, stitch the princess seams. Press seam allowances open. Stitch the center back seam. Press seam allowance open.
- On the front, stitch the darts. Press the dart folds downwards. Attach the pocket bag to the front and side front respectively. On the front, stitch the princess seams, simultaneously stitching the pocket bag. Press seam allowances open, clipping the corner on the side front. Press the pocket towards the center.
- Stitch the shoulder seams of the coat simultaneously with the seam of the integrated stand collar. Clip and press seam allowances open.
- Stitch the side seams. Press seam allowances open.
- Stitch the cuff into a loop. Press seam allowances open. Fold the cuff in half lengthwise and sew 13 topstitches. Stitch the sleeve seam. Press seam allowance open. Attach the cuff to the sleeve. Press seam allowance upwards. Set the sleeve into the armhole. Attach shoulder pads.
- On the belt loop piece, overlock one long edge. Press the unoverlock edge inwards, covering it with the overlock edge. Stitch a double seam, securing the long seam allowances. Cut the belt loop into 2 pieces. Attach the belt loops at the level of the side seam.
- Stitch the center seam of the back neck facing. Stitch the shoulder seams of the front facings and the facing, simultaneously with the stand collar seam. Press seam allowances open.
- Create loop buttonholes on the right front. Attach the loops according to markings.
- Press up the hem allowance. Place the front facing on the right side of the front, right side down. Stitch the bottom edge of the front facing to the hem allowance. Press seam allowances upwards. Pin the front facing and the top of the garment and stitch along the front edge and the stand collar. Stitch the bottom edge of the front facing to the front strictly along the marked hemline, stopping 1.5 cm before the inner edge of the front facing. Turn the front edges and stand collar to the right side, straighten the seams.
- On the lining fabric pieces, stitch the seams, leaving an opening in the left side seam for turning out later. Set in the sleeves. Attach the lining to the front facings and the facing.
- Attach the lining to the cuff attachment seam. Attach the lining to the hem of the garment. Turn the coat right side out through the opening. Sew the opening closed.
- Fold the belt in half lengthwise and stitch along two long sides and one short side. Trim seam allowances at the corners and turn right side out. Sew 4 topstitches. Insert the buckle, folding and topstitching the free end of the belt.
- Sew 6 decorative parallel topstitches along the front edge, at the bottom, and the top edge of the stand collar.
- Attach buttons.