Professional made-to-measure digital sewing patterns — PDF · PLT · DXF AAMA

Minervainervabeta
#2585
#2587

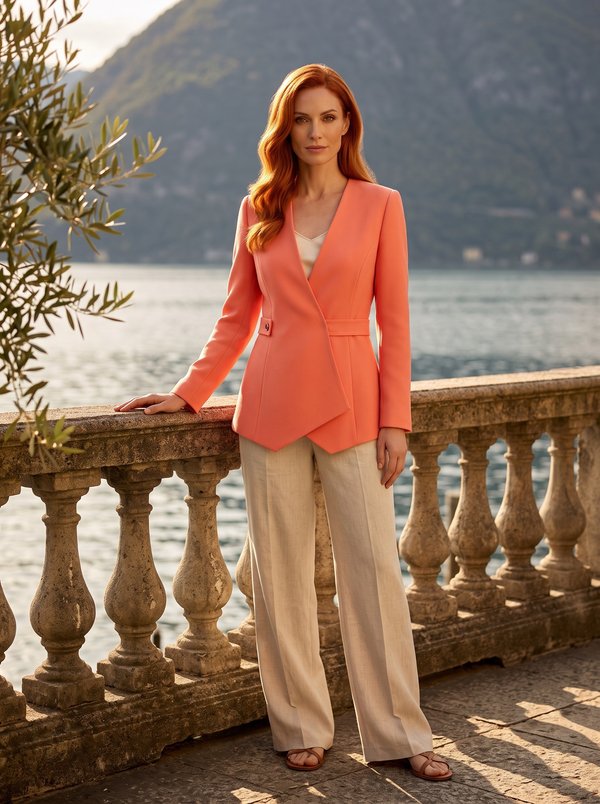
Fitted Asymmetrical Contrasting Panel Blazer

Pattern #2586

A hip-length fitted women's jacket for low-stretch knit fabric, with a collarless V-neck, an asymmetric one-button front edged with a contrast-colour trim strip, princess seams and long set-in sleeves. Drafted to your own measurements. Recommended fabric: low-stretch knit fabrics from natural or blended fibres in contrasting colours: one for the body, one for the front trim.

Tech. Description

Fitted Asymmetrical Contrasting Panel Blazer

A hip-length fitted women's jacket for low-stretch knit fabric, with a collarless V-neck, an asymmetric one-button front edged with a contrast-colour trim strip, princess seams and long set-in sleeves.

When To Wear

  • For the office over a top, with trousers or a skirt.
  • In spring and autumn as a light jacket.

Key Design Features

Silhouette: Fitted through the waist by princess seams front and back.

Length: Hip length.

Neckline: Collarless V-neck; back neck finished with a facing.

Sleeves: Long one-piece set-in sleeves with eased caps; shoulder pads.

Front: Asymmetric fronts: the right front carries a two-layer trim strip in a contrasting colour, running diagonally from the neck to the hem; the left front is finished with a facing.

Closure: One button at the waist, buttonhole on the right front.

Back: Centre back seam and two princess seams.

Finishing: Bust darts and princess seams on the front; hems of the body and sleeves overlocked and blind-stitched.

Level Of Difficulty

Intermediate. Asymmetric fronts with a separately faced trim, princess seams with bust darts, eased set-in sleeves and hand blind-stitched hems.

Fabric Recommendations

Low-stretch knit fabrics from natural or blended fibres in contrasting colours: one for the body, one for the front trim.

Additional Supplies

  • Contrast fabric for the front trim
  • Fusible interfacing (left facing, back neckline facing, front trim)
  • Shoulder pads
  • 1 button

Cutter's Must

When stitching pieces, pay attention to the notches - they must match! Markings on the patterns are made on the right side!

From main fabric:

  • Center Back – 2 pieces
  • Side Back – 2 pieces
  • Side Front – 2 pieces
  • Center Right Front – 1 piece
  • Center Left Front – 1 piece
  • Sleeve – 2 pieces
  • Left Center Front Facing – 1 piece
  • Back Neckline Facing – 1 piece

From contrast fabric:

  • Front Trimming – 2 pieces

From fusible interfacing:

  • Left Center Front Facing – 1 piece
  • Back Neckline Facing – 1 piece
  • Front Trimming – 1 piece

Sewing Instructions

  1. Fuse interfacing to the Left Center Front Facing, the Back Neckline Facing and one Front Trimming piece.
  2. Stitch the back princess seams (Center Back to Side Back), press the allowances towards the center, serge. Stitch the center back seam, press the allowances to the left, serge.
  3. Stitch the bust darts, press them upwards. Stitch the front princess seams (Center Right Front and Center Left Front to Side Front), press the allowances towards the center, serge.
  4. Place the two Front Trimming pieces right sides together and stitch along the front edge and the lower edge. Notch the allowances at the corners, turn right side out and press. Stitch the trim to the Center Right Front, press the allowances towards the jacket and serge.
  5. Serge the outer edge of the Left Center Front Facing. Place the facing on the Center Left Front right sides together and stitch along the front edge and the lower edge. Notch the allowances at the corners, turn right side out and press.
  6. Serge the outer edge of the Back Neckline Facing. Place the facing on the back and stitch along the neckline exactly up to the marked shoulder seam line. Clip the allowances, turn the facing to the wrong side and press.
  7. Stitch the shoulder seams, placing the front between the back and the Back Neckline Facing; press the allowances towards the back and serge. Stitch the side seams, press the allowances towards the back, serge.
  8. Stitch the Sleeve seam, press the allowances towards the back, serge.
  9. Set the sleeves into the armholes, matching the notches and easing the sleeve cap at the top. Press and serge the allowances. Attach the shoulder pads.
  10. Serge the hem edges of the jacket and sleeves, press them to the wrong side and sew them by hand with blind stitches.
  11. Make a buttonhole on the right front and sew the button on the left front.

Features

Order Pattern

Standard Sizes

Individual Measurements

Please double-check the file format and paper size. Your pattern is drafted in exactly the format you select; a different format or paper size later is a new order.

Similar patterns

View all
Support

Minerva Support

Online
Support
Hi! I'm Minerva's AI assistant. What can I help you with?