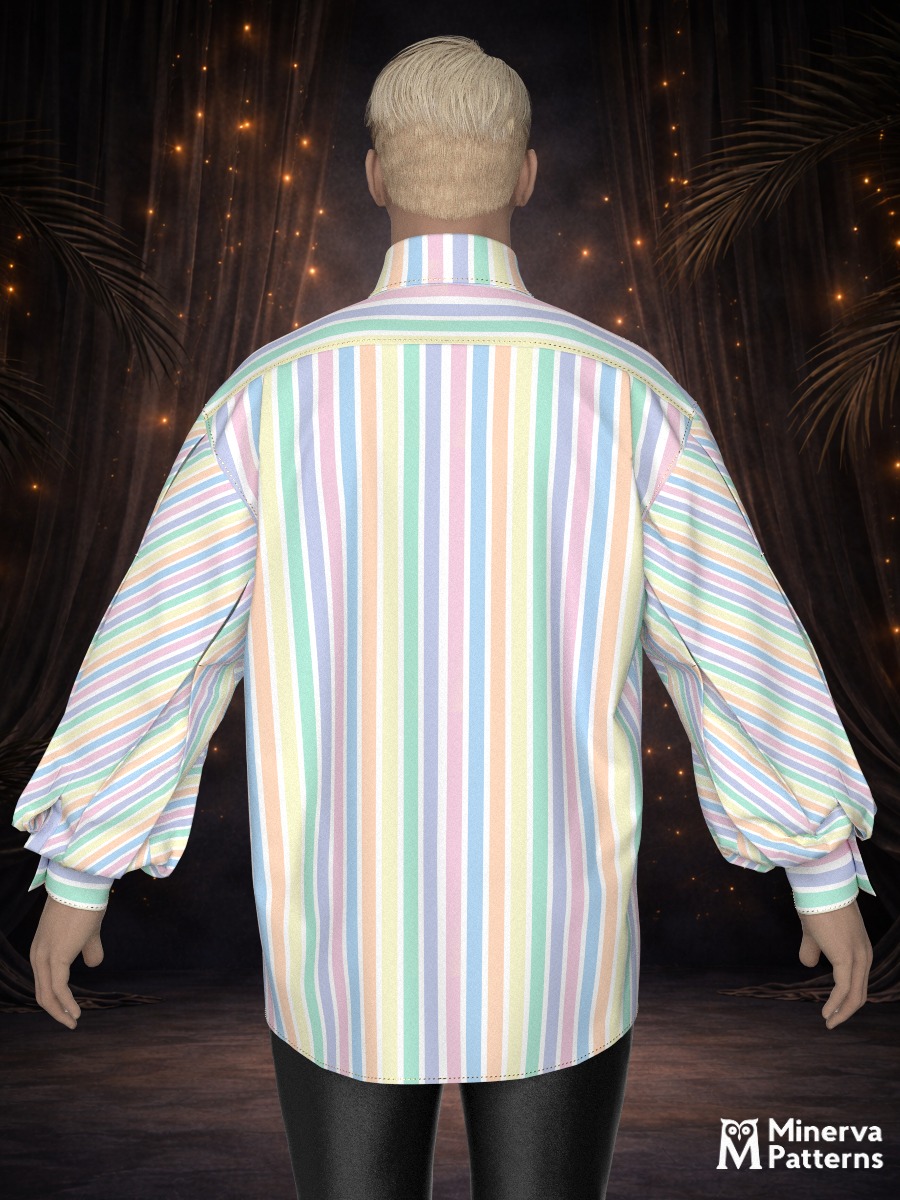
One Size Oversized Statement Sleeves Shirt
Sewing Pattern 1649 is an expressive unisex oversize shirt featuring a concealed front placket, reinforced yoke construction, and architecturally pleated sleeves with pronounced volume — structured shirtmaking with sculptural sleeve design.
The straight-cut body and balanced proportions create a relaxed, non-gendered silhouette. Drafted as a one size garment, the fit adapts to a wide range of body types depending on fabric choice and styling.
When To Wear
This shirt is designed as a statement piece rather than a basic wardrobe staple, suitable for:
-
Modern Workwear & Creative Uniforms: a distinctive shirt that combines functionality with strong visual character.
-
Contemporary Casual Styling: Works as a standalone garment paired with trousers or denim, emphasizing silhouette and sleeve volume.
-
Layered Looks: Designed to be worn under waistcoats or coats where the sculpted sleeves remain a key visual feature.
Key Design Features
Silhouette: Straight-cut oversize unisex body with a clean, structured fit, allowing the sleeves to become the dominant design element.
Neckline & Collar: Classic shirt collar with a high collar stand, providing a sharp neckline that contrasts with the expressive sleeve shape.
Front Closure: Button-front closure with a hidden button placket, creating a clean, uninterrupted front appearance.
Sleeves: Set-in long sleeves with engineered pleating at the armhole, creating pronounced volume through the upper sleeve and controlled shaping toward the cuff.
Cuffs: Structured high cuffs with button closure, designed to balance sleeve fullness and maintain a crisp finish.
Back: One-piece back combined with a double-layer yoke (inner and outer yokes) for strength, structure, and a refined interior finish.
Level Of Difficulty
Intermediate to Advanced. Precise execution is required for sleeve pleats, hidden placket construction, yoke sandwiching, cuff alignment, and collar-and-stand assembly.
Fabric Recommendations
Choose fabrics that support sleeve volume while maintaining structure:
- Crisp cotton poplin or shirting twill
- Oxford cloth
- Dense linen or linen blends
- Other woven fabrics with body and good pressing properties
Avoid overly soft or fluid fabrics that would collapse the pleated sleeve shape.
Supplies
- Main fabric, width 150 cm
- Lightweight woven fusible interfacing
- Buttons (quantity according to size and design)
Cutter’s Must
From Main Fabric:
- Front – 2 pieces (left and right)
- Back – 1 piece on fold
- Yokes – 2 pieces on fold (inner and outer)
- Sleeves – 2 pieces (left and right)
- Cuffs – 4 pieces
- Sleeve Plackets – 2 pieces
- Collar – 2 pieces on fold
- Collar Stand – 2 pieces on fold
- Hidden Placket Piece – 1 piece
From Fusible Interfacing:
The following pattern pieces must be fused with lightweight woven interfacing:
- Cuffs – all 4 pieces (left & right)
- Collar – inner collar piece
- Collar Stand – outer collar stand
- Hidden Buttonhole Placket Piece – 1 piece
Important Information
Before cutting your fabric:
- Print and lay out pattern pieces to determine yardage.
- Check mirrored pieces, notches, and grainlines.
- For patterned fabrics, align carefully for symmetry.
Assembly Instructions
Preparation
Cut all pieces according to the pattern:
-
Front: 2 pieces (left & right)
-
Back: 1 piece on fold
-
Yokes: 2 pieces on fold (inner & outer)
-
Sleeves: 2 pieces (left & right)
-
Cuffs: 4 pieces (left & right) — fuse lightweight woven interfacing
-
Sleeve Plackets: 2 pieces (left & right)
-
Collar: 2 pieces on fold (inner part fused with lightweight woven interfacing)
-
Collar Stand: 2 pieces on fold (outer part fused with lightweight woven interfacing)
-
Hidden Placket Piece: 1 piece (fused with lightweight woven interfacing)
Transfer all markings to fabric: pleats, button placements, and notches.
Front Plackets
Right Front – Button Placket
- Fold the right center front placket seam allowance inward according to the markings.
- Secure with a single-needle topstitch, maintaining a clean outer appearance.
Left Front – Hidden Buttonhole Placket
- Prepare the hidden buttonhole placket by fusing interfacing and folding at the center.
- Work buttonholes on the placket piece according to markings.
- Attach the placket to the left front panel, folding it under as marked to encase the seam.
- Stitch to secure, keeping the outer finish clean.
Yoke & Back
Back Pleats
- Fold two regular pleats (1.5 cm each) at the back panel, angled toward the side seams.
- Tack pleats in place to hold volume, following the cut marks.
Yoke Attachment
- Sandwich the back panel between the inner and outer yokes.
- Stitch the yoke seam and press seam allowances toward the yoke.
- Edge-stitch along the yoke seam for reinforcement.
Shoulder Seams
- Join the Fronts to the Back/Yoke at the shoulder seams, right sides together.
- Do not sew side seams at this stage (sleeves are attached first).
Sleeves
Armhole Pleats
- Fold four box pleats at the armhole (2 front, 2 back, each 2.5 cm).
- Tack pleats to hold volume.
Cuff Pleats
- Fold four box pleats at the sleeve hem (2 front, 2 back, each 1.5 cm).
- Tack pleats to hold volume.
- Press armhole and cuff pleats along the pattern marking lines.
- Add a bartack below the armhole to secure pleats, following the reference sketch.
Sleeve Placket
- Prepare the sleeve placket.
- Cut the slit at the marked position.
- Attach the placket piece to the outer edge with a square finish.
- Cover the inner edge with the binding.
Sleeve Attachment
- Set sleeves into armholes, matching all pattern notches.
Side Seams
- Sew the side seam and underarm seam in one continuous operation.
Cuffs
Cuff Preparation
- Place inner and outer cuff pieces right sides together.
- Sew side seams and lower edge.
- Trim corners, turn right side out, shape edges, and press.
- Mark buttonhole and button positions according to the pattern.
Attach Cuffs
- Align the cuff buttonhole side with the sleeve placket edge.
- Align the button side with the binding edge.
- Distribute sleeve fullness evenly using pleats to match cuff circumference.
- Attach cuff, ensuring a clean finish on the inside.
- Work two buttonholes as marked and sew buttons on the opposite side.
Collar & Collar Stand
Collar Preparation
- Place inner and outer collar pieces right sides together.
- Stitch side seams and lower edge.
- Trim corners, turn right side out, shape edges, and press.
Collar Stand Assembly
- Place inner and outer collar stand pieces right sides together, sandwiching the prepared collar between them.
- Stitch along the outer edges, leaving the neckline edge open.
- Turn right side out and press thoroughly.
Attach Collar Stand
- Attach the collar stand to the neckline seam.
- Finish inside cleanly.
Hem Finishing
- Finish the hem with a double fold: 1 cm + 1 cm.
- Topstitch to secure.
Buttons & Buttonholes
- Mark buttons and buttonhole placements according to the pattern specifications.
- Sew buttons, ensuring correct alignment with buttonholes.