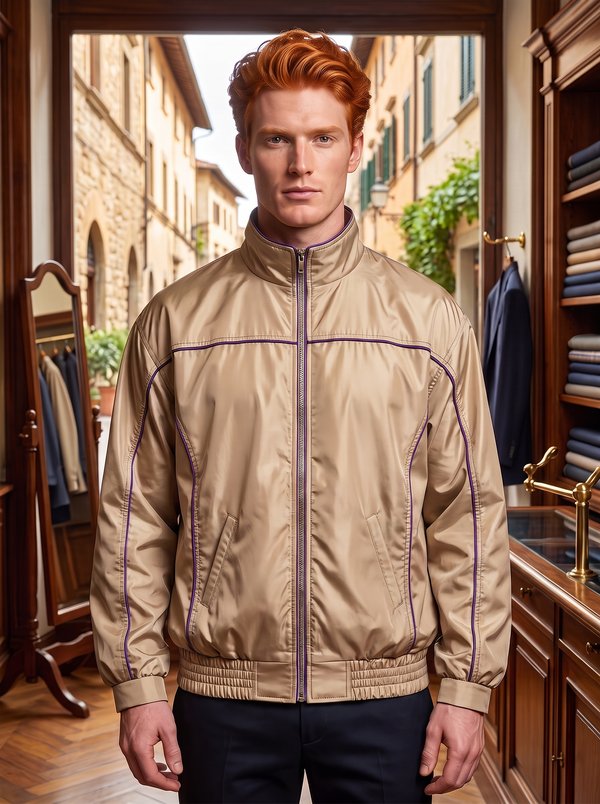
Curved Yoke Full Zip Jacket
A lined men's and unisex hip-length jacket in raincoat fabric, with a stand collar, a full-length separating zip and curved piped yoke seams across chest and back. The yoke continues into a centre panel along the top of the sleeve; zipped pockets sit in the front panel seams.
When To Wear
- As a windbreaker for walking, cycling and travel in spring and autumn.
- With a fleece or polar fleece lining as a warmer jacket for cold days.
Key Design Features
Silhouette: Relaxed, straight fit, drawn in at the hem by an elastic cord.
Length: Hip length.
Collar: Stand collar; the upper collar is backed with thin wadding stitched round the edges. The zip runs up to the top of the stand.
Front: Separating zip sewn between the shell and the lining; front edges and collar topstitched. Below a curved inset, each front has a front and a side front panel.
Pockets: Zipped pockets in the seams between front and side front, with bar tacks at the ends of the opening; the pocket bags reach down to the hem.
Back: Back yoke, a curved back inset below it, and a back with side back panels; seams topstitched.
Sleeves: Each sleeve has a centre panel joined to the yoke and a lower sleeve in two pieces attached at the armhole. The yoke and inset seams carry corded piping made from bias strips of the main fabric. Cuffs with 4.5 cm elastic held by two rows of topstitching.
Finishing: Double-turned, topstitched hem with an elastic cord coming out through small buttonholes and held by two cord stoppers.
Lining: Full body and sleeve lining reaching to the hem fold, with the front facing topstitched onto the front lining.
Level Of Difficulty
Intermediate. Making and inserting corded piping on curved seams, zipped pockets in panel seams, a multi-panel sleeve joined to the yoke and a separating zip set between shell and lining.
Fabric Recommendations
Polyester raincoat fabrics. For the lining, mesh knit; for a warmer version, fleece or Polartec.
Additional Supplies
- Mesh knit, fleece or Polartec for the lining
- Thin wadding (sintenit) for the upper collar
- Fusible interfacing
- 1 separating zip, front length including the collar stand
- 2 closed-end zips, the length of the pocket openings
- Piping cord
- Elastic tape, 4.5 cm wide, for the cuffs
- Elastic cord for the hem
- 2 cord stoppers
Cutter's Must
If the patterns have a double contour, they include seam allowances. If the contour is single, the patterns do not include seam allowances. Seam allowances: for the hem of the main fabric pieces – 4.5cm, for the lining hem – 0cm (lining reaches the hem fold), other seams 1cm. Attention! First, print out the paper patterns and lay them out on the fabric width (fabric width can be from 90cm to 150cm) to determine how much material you will need (do not forget to account for paired and symmetrical pieces, as well as the color scheme).
- Main fabric:
- Front – 2 pieces
- Back – 1 piece
- Back Yoke – 1 piece
- Front Yoke – 2 pieces
- Back Inset – 1 piece
- Front Inset – 2 pieces
- Side Front – 2 pieces
- Side Back – 2 pieces
- Center Sleeve – 2 pieces
- Lower Sleeve – 4 pieces
- Collar – 2 pieces
- Cuff – 2 pieces
- Center Front Facing – 2 pieces
- Bigger Pocket Bag – 2 pieces
- Smaller Pocket Bag – 2 pieces
- Cut bias strips 3.5cm wide from the main fabric for making piping. The length of the strips depends on the length of the piping. Attention! After making the piping, a 1cm seam allowance must remain. Otherwise, adjust the width of the cut strips yourself.
- Lining:
- Front Lining – 2 pieces
- Back Lining – 1 piece
- Sleeve Lining – 2 pieces
- Thin insulation (Syntepon): back the upper Collar piece cut from the main fabric with insulation, stitching them together along the edges.
- Fusible interfacing: pocket placement area on the Fronts.
Sewing Instructions
When stitching pieces, pay attention to the notches - they must match!
- Zipper pockets in seams. Fuse interfacing to the pocket placement area on the front. Stitch the zipper together with the Smaller Pocket Bag to the Front. Stitch the other edge of the zipper together with the Bigger Pocket Bag to the Side Front. Clip allowances at the corners. Stitch the Side Front to the Front, stitching the pocket bags together at the same time. Make bar tacks at the pocket opening and topstitch. The edges of the pocket bags should be caught in the zipper seam and reach the hemline.
- Making piping. Stitch the bias strips together and press the seams. Fold the resulting strip in half, insert the cord inside, and stitch close along the cord.
- Assembling the outer shell. Stitch the Side Back pieces to the Back. Topstitch the seams. Stitch the Back Inset and Front Insets to the back and fronts, inserting the piping. Topstitch. Stitch the Lower Sleeve pieces to the armholes. Stitch the shoulder seams. Topstitch the shoulder seam on the back. Stitch the Center Sleeve pieces to the yokes. Stitch the lower sleeve pieces together along the middle seam. Stitch the yokes to the back and fronts, joining the center and lower sleeve pieces at the same time and inserting the piping. Topstitch the yoke attachment seam. Topstitch the sleeve attachment seams at the armholes. Stitch the side seams and sleeve seams. Stitch the upper collar into the neckline.
- Lining. Press under the inner edge of the Center Front Facing and topstitch the facing onto the Front Lining. Stitch the jacket lining. Stitch the under collar into the lining neckline.
- Cuffs. Stitch the cuffs and the elastic tape into rings separately. Insert the elastic tape into the cuff, stretch it to the length of the cuff, and sew 2 rows of topstitching. For industrial processing, it is recommended to first secure the elastic tape in the cuff, and then join the cuff into a ring with a lapped seam. Attach the cuffs to the sleeves, catching the edge of the elastic in the seam.
- Zipper closure. Place each half of the separating zipper on the front edge of the jacket, right sides together (teeth pointing away from the edge). Stitch the lining to the front edges and collar edges, catching the zipper in the seam at the same time. Turn the garment right side out.
- Attach the lining to the cuffs.
- Sew small buttonholes for the cord in the hem allowance. Press the hem allowance, first turning up 1cm, then 3.5cm. Topstitch the hem allowance.
- Topstitch the front edges and collar of the jacket.
- Press the finished jacket.
- Thread the elastic cord through the hem from the wrong side and fit the cord stoppers.