Bolero with Two-Piece Collar
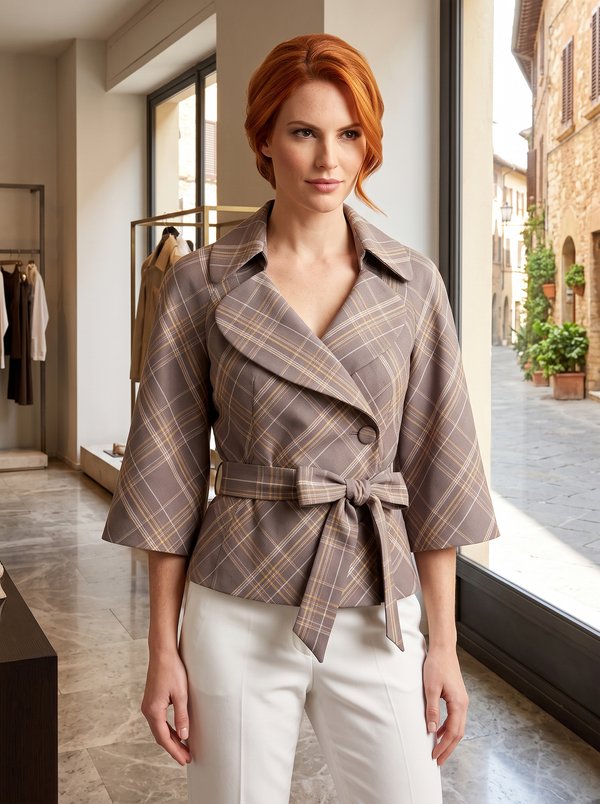
A women's cropped, lined bolero with a rounded collar, a curved seam dividing the upper and lower front, rounded overlapping front edges fastened with one button, and short cap sleeves with a gathered lower layer.
When To Wear
- Over sleeveless and strapless dresses for evening events and weddings.
- With a matching skirt or trousers as a two-piece outfit in spring and summer.
Key Design Features
Silhouette: Fitted and cropped above the waist.
Collar: Separate collar with rounded ends, cut in two pieces and interfaced, set into the neckline.
Sleeves: Short sleeves in two layers: a smooth upper sleeve lined with lining fabric, and a lower outer piece gathered along its upper and lower edges and faced with a lower inner piece.
Front: Upper front joined to a curved, interfaced lower front; the rounded front edges overlap and close with one button and buttonhole.
Back: Centre back seam and darts on the upper back, with a separate interfaced lower back band.
Lining: Lined throughout: the upper back and front are lined with lining fabric, and the lower pieces are cut double from main fabric. The armholes, front and hem edges are finished by bagging out.
Level Of Difficulty
Intermediate. Curved seams, a two-layer gathered sleeve, a bagged-out lining finished around the armholes and a collar set into the neckline.
Fabric Recommendations
Suiting fabrics from natural or blended fibres.
Additional Supplies
- Lining fabric
- Fusible interfacing (lower back, lower fronts, collar)
- 1 button
Cutter's Must
- From main fabric:
- Upper back – 2 pieces
- Lower back – 2 pieces
- Upper front – 2 pieces
- Lower front – 4 pieces
- Collar – 2 pieces
- Upper sleeve – 2 pieces
- Lower inner sleeve – 2 pieces
- Lower outer sleeve – 2 pieces
- From lining fabric:
- Upper back – 2 pieces
- Upper front – 2 pieces
- Upper sleeve – 2 pieces
- From fusible interfacing:
- Lower back – 1 piece
- Lower front – 2 pieces
- Collar – 1 piece
Sewing Instructions
- Fuse the corresponding pieces with fusible interfacing.
- Stitch the darts on the back, press the fullness towards the center. Stitch the center back seam, press seam allowances to the left side. Attach the lower back to the upper, press seam allowances towards the lower.
- Attach the lower front to the upper, clip seam allowances and press towards the lower.
- Along the upper and lower edges of the lower outer sleeve, stitch with loosely tensioned stitches and gather. Fold the lower outer and inner pieces right sides together and stitch along the lower edge. Turn the pieces right side out and press. Secure the pieces along the upper edge, after evening out the length. Fold the upper and lining pieces of the upper sleeve right sides together, insert the lower sleeve between them and stitch. Turn the pieces right side out and press. Continue to treat as one piece.
- Attach the sleeves to the back and front pieces, press seam allowances.
- Stitch the side seams. Press seam allowances towards the back.
- Stitch the darts and the center seam on the lining back pieces. Attach the interfaced lower back to it. Attach the interfaced lower front to the front lining. Stitch the side seams of the lining, press seam allowances open.
- Place the lining on the main garment right side in and stitch the lower edge of the left armhole. Clip seam allowances at the sleeve and at the curves. Turn the jacket right side out, attach the lining into the sleeve attachment seam. Process the right armhole similarly.
- Fold the main garment with the lining right sides together and stitch the front edge and the lower edges of the front and back. Clip seam allowances at the curves, turn the jacket right side out. Secure the lining to the garment along the neckline edge.
- Fold the collar pieces right sides together and stitch along the outer edge. Start and end the stitching precisely at the marked collar attachment line. Clip seam allowances at the curves, turn the collar right side out.
- Attach the lower collar to the neckline. Clip the attachment seam and press towards the collar. Fold the seam allowance of the upper collar inwards and topstitch into the attachment seam.
- On the right front, make a buttonhole; on the left front, sew a button accordingly.