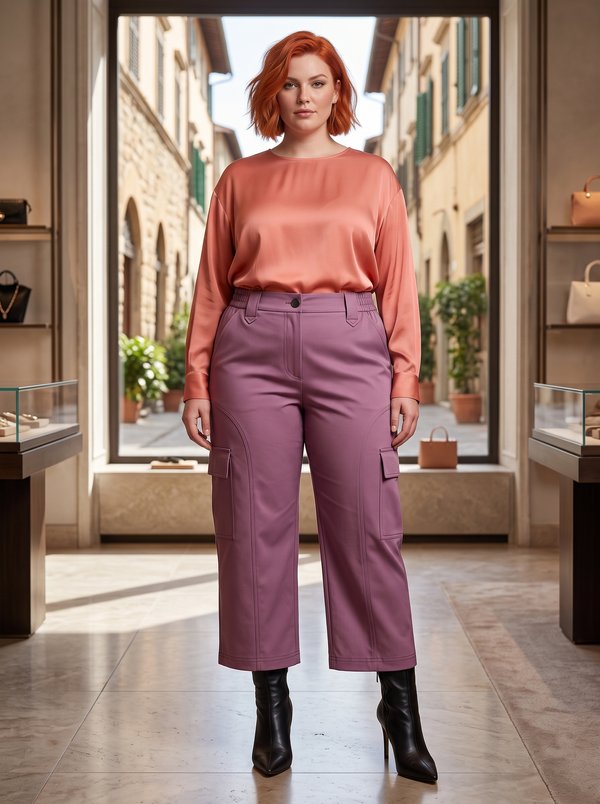
Utility Cropped Cargo Pants with Cuffs
Women's cropped cargo pants with full legs drawn into deep folded cuffs, slanted zipped welt pockets on the fronts, side cargo pockets with buttoned flaps and a double-welt back pocket.
When To Wear
- Everyday and weekend wear in spring and summer, with T-shirts, tank tops and trainers.
- Travel and outdoor walks, where zipped pockets keep small items secure.
Key Design Features
Silhouette: Full, straight legs with the fullness held in by the cuffs, so the leg blouses over them.
Length: Cropped, ending below the knee.
Waist: Straight waistband folded in half, interfaced, fastened with one button and buttonhole.
Closure: Front fly zipper with cut-on fly facings and a separate fly shield.
Pockets: Slanted welt pockets on the fronts with zippers set under the opening so the teeth show; patch cargo pockets on the side seams with a gusset, closed by a buttoned flap topstitched 0.2 cm from the edge; one double-welt pocket on the back.
Back: Centre back seam stitched twice along the seat.
Legs: Cuffs cut double, folded in half lengthwise and sewn into a ring, then stitched to the lower edge of the leg.
Finishing: Seams serged and pressed open; belt loops on the waistband.
Level Of Difficulty
Intermediate. A fly zipper with a fly shield, double-welt and zipped welt pockets, gusseted cargo pockets with flaps.
Fabric Recommendations
Fabric of natural or blended fibres.
Additional Supplies
- Fusible interfacing (waistband, flaps, fly shield)
- Grain line tape for the pocket openings
- 3 zippers (fly and two front pockets)
- 5 buttons
- Lining fabric (back pocket bag)
Cutter's Must
- From main fabric:
- Front Half – 2 pieces
- Back Half – 2 pieces
- Side Pocket – 2 pieces
- Pocket Side – 2 pieces
- Side Flap – 4 pieces
- Back Pocket Facing – 2 pieces
- Back Pocket Big Lining – 1 piece
- Smaller Pocket Lining – 2 pieces
- Bigger Pocket Lining – 2 pieces
- Button Catch – 1 piece
- Cuff – 2 pieces
- Waistband – 1 piece
- From lining:
- Back Pocket Small Lining – 1 piece
- From fusible interfacing: Waistband, Side Flap, Button Catch.
Sewing Instructions
- Fuse interfacing to the Waistband, Side Flaps and Button Catch.
- Mark the location of the back pocket on the back pant half. Reinforce the pocket opening with grain line tape. Clarify the back pocket placement. Fold the Back Pocket Facings in half, wrong sides together, and press. Mark a guide line on each facing parallel to the fold for attaching it. Mark guide lines parallel to the pocket opening for attaching the facings. Stitch the facings to the back half. Finish the ends of the stitches at the parallel pocket marking lines. Check the correctness of the facing attachment from the wrong side (stitches should be parallel). Cut open the pocket opening. At a distance of 1-1.5 cm from the end of the pocket, make diagonal cuts. Turn the facings through the resulting opening to the wrong side, straighten the edges, and adjust the ends of the facings. Secure the ends of the pocket from the wrong side with a double backstitch at the base of the corners. Stitch the Back Pocket Small Lining and Back Pocket Big Lining to the facing seam allowances. Stitch the pocket bags together and serge.
- Mark the location of the slanted zipper pocket on the Front Half. Reinforce the pocket opening with grain line tape. Clarify the pocket placement and the pocket opening line. Cut open the pocket opening. At a distance of 1-1.5 cm from the end of the pocket, make diagonal cuts. Turn the pocket seam allowances through the resulting opening to the wrong side, straighten the edges. Adjust the end of the pocket from the wrong side. Place the zipper under the edges of the pocket opening so that the teeth are visible. Stitch in the zipper and stitch the Smaller and Bigger Pocket Linings to the zipper tape allowances. Stitch the pocket bags together and serge.
- Serge the side edges of the back and front. Stitch and press open the side seams.
- Place the Side Flap pieces right sides together in pairs and stitch along the outer edge. Turn the flap through the upper open edge. Straighten the seams and topstitch at a distance of 0.2 cm from the edge of the flap. Mark the location of the flap on the pants. Serge the upper edge of the flap, stitch to the pants, turn back and topstitch at a distance of 0.5 cm.
- Mark the location of the side cargo pocket on the pants. Serge the outer edge of the Pocket Side (gusset). Stitch the Pocket Side to the side and bottom edges of the Side Pocket and serge. Serge the upper edge of the pocket, turn it under and topstitch. Place the pocket on the marking, fold under the edge of the gusset and topstitch it to the pants.
- Serge the edges: inseams, front crotch and fly edge, back crotch seam.
- Stitch and press open the inseams.
- Stitch the front and back crotch seam up to the zipper notch. Stitch a second line along the seat seam next to the stitching line of the front and center seam.
- Press the one-piece zipper facings to the wrong side. Stitch the zipper under the edge of the zipper seam allowance (left side) to the edge. Stitch the free zipper tape to the one-piece facing of the right half. Fold the Button Catch (fly shield) in half lengthwise and stitch the short bottom end. Serge the long edge of the Button Catch. Stitch the one-piece zipper facing to the Button Catch on the left pant half. Topstitch the right edge of the opening, catching the facing.
- Fold the belt loop in half lengthwise, right sides together, align the edges and stitch at a distance of 0.5-0.7 cm from the edges. Then turn out, straighten the seam, positioning it on the fold or forming a piping on the inside 0.1-0.2 cm wide, and press.
- Serge the bottom edge of the waistband. Fold the waistband in half lengthwise, wrong sides in, and press.
- Cut the belt loops to size, mark the location of the belt loops on the waistband and stitch to the bottom edge of the upper waistband. Stitch the waistband to the upper edge and stitch the waistband corners. Trim the corners and turn out the waistband. Topstitch the serged edge into the waistband attachment seam. Topstitch the free ends of the belt loops to the upper edge of the waistband.
- Fold the cuff in half lengthwise, wrong sides together, and press. Unfold it, stitch the short ends into a ring and press the seam open. Press the bottom of the cuff. Stitch the cuffs to the bottom edge of the pants. Serge and press the seam.
- On the right side of the waistband, make a buttonhole, and on the left, sew on a button. Mark and make buttonholes on the side flaps. Mark and sew the buttons onto the side cargo pockets.