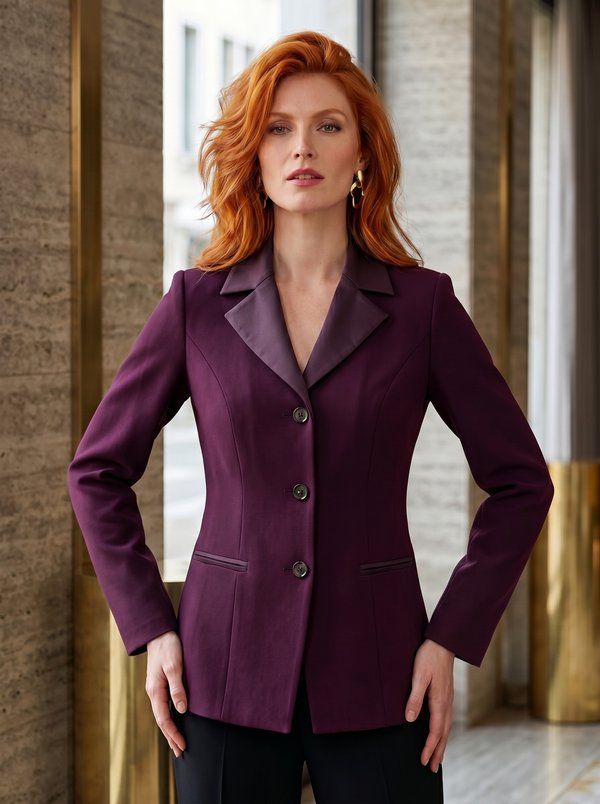
Classic Single-Breasted Blazer
A hip-length women's blazer with front and back princess seams, a notched collar, double-welt pockets without flaps and two-piece sleeves with a buttoned vent. Fully lined.
When To Wear
- For office and business wear, with a matching pencil skirt or trousers.
- Over shirts and fine knitwear in spring and autumn.
Key Design Features
Silhouette: Fitted through the waist by princess seams on the front and back.
Length: Hip length, with rounded corners at the front hem.
Collar: Notched collar with lapels; the upper collar is joined to the facings and back neckline facing, the under collar to the jacket neckline.
Sleeves: Two-piece set-in sleeves, cap eased in, with a vent formed by a cut-on vent facing and extension and closed with small buttons. A strip of wadding about 4 cm wide is sewn to the armhole seam allowances in the cap area.
Front: Single-breasted with buttonholes on the right front; three buttons in the photo. Separate front facings.
Pockets: Double-welt (jetted) pockets on the fronts, with the welt folds joined by hand and pocket bags in lining.
Back: Centre back seam and back princess seams.
Lining: Full lining of body and sleeves, sewn to the facings and to the hem allowances of the jacket and sleeves.
Level Of Difficulty
Advanced. Double-welt pockets, two-piece sleeves with a buttoned vent, a collar set between the jacket and the facings, full lining.
Fabric Recommendations
Medium-weight suiting with body: wool and wool blend suiting, flannel, tweed, gabardine.
Additional Supplies
- Lining fabric
- Fusible interfacing (front facings, back neckline facing, collar, pocket welts)
- Buttons for the front
- Small buttons for the sleeve vents
- Wadding strips about 4 cm wide for the sleeve caps
Cutter's Must
- From main fabric:
- Center Front – 2 pieces
- Side Front – 2 pieces
- Center Back – 2 pieces
- Side Back – 2 pieces
- Back Neckline Facing – 1 piece
- Collar – 2 pieces
- Upper Sleeve – 2 pieces
- Lower Sleeve – 2 pieces
- Center Front Facing – 2 pieces
- Pocket Facing – 4 pieces
- From fusible interfacing:
- Center Front Facing – 2 pieces
- Back Neckline Facing – 1 piece
- Collar – 1 piece
- Pocket Facing – 4 pieces
- From lining:
- Center Front – 2 pieces
- Side Front – 2 pieces
- Center Back – 2 pieces
- Side Back – 2 pieces
- Upper Sleeve – 2 pieces
- Lower Sleeve – 2 pieces
- Upper Pocket Bag – 2 pieces
- Lower Pocket Bag – 2 pieces
Sewing Instructions
- Sew the front princess seams.
- Double-welt pockets: Place both bias pocket facings (welts) of each pocket on the front, right sides together, pin along the marked pocket opening line and stitch along the marked stitching lines, aligning the long edges of the pocket facings exactly with the pocket opening line.
- Cut the front along the opening between the stitching lines, cutting diagonally towards the front ends of the stitching. Be careful not to cut the pocket facings!
- Press the seam allowances open. Turn the pocket facings through the opening to the wrong side, wrapping them around the seam allowances, and baste.
- From the right side, stitch in the ditch of the pocket facing seams.
- Turn the small triangle at the front end of the opening to the wrong side and stitch it to the pocket facings, exactly from the end of one stitching line to the end of the other.
- Join the folds of the welts with an invisible hand stitch.
- From the wrong side, attach the pocket bags: the lower pocket bag to the seam allowances of the lower pocket facing, the upper pocket bag to the seam allowances of the upper pocket facing.
- Press the pocket bags downwards, trim them even and stitch them together.
- Sew the back princess seams, side seams, and shoulder seams.
- When sewing the side seams, do not catch the side edges of the pocket bags.
- Two-piece sleeves: Stitch the sleeve seams. Hem the sleeves. Press the vent edges.
- From the wrong side of the sleeve, stitch together the long edges and the short upper edges of the cut-on vent facing and the vent extension.
- Sew small buttons onto the sleeve, catching the vent extension.
- Set in the sleeves, easing the cap.
- Sew a strip of wadding approx. 4 cm wide to the armhole seam allowances in the sleeve cap area.
- Stitch the two collar pieces together along the outer edges, turn, and baste the open edges together into the neckline.
- Place the center front facings on the fronts, right sides together, and stitch along the front edges and lapels up to the collar point. Clip the allowance near this point.
- Stitch the back neckline facing to the upper ends of the center front facings.
- Place the collar with its open edges between the jacket and the facings, with the under collar lying on the jacket.
- Stitch the upper collar to the neckline of the facings and back neckline facing. Stitch the under collar into the jacket neckline.
- Clip the seam allowances at the curves multiple times. Press the seam allowances open.
- Turn the facings to the wrong side and press the edges.
- From the inside, stitch together the collar seam allowances along the back neckline.
- Fold the center front facings forward.
- Turn the hem allowance to the wrong side up to the front edges and stitch.
- Turn the facings back to the wrong side and sew them to the hem allowance.
- Stitch the seams on the lining.
- Stitch the front edges of the lining to the center front facings, right sides together, starting and ending the seam about 8cm from the bottom edge.
- Pull the lining wrong side to wrong side into the jacket.
- Turn under the open edges of the lining and sew to the hem allowance of the jacket and sleeves.
- Slipstitch the remaining open front edges of the lining to the facings.
- Make the buttonholes along the right front edge as marked. Sew on the buttons.