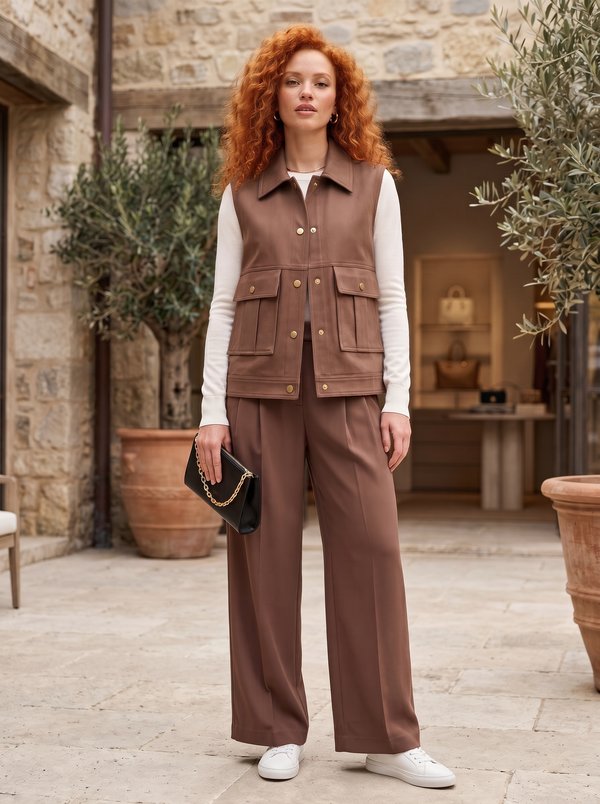
Cropped Collared Snap Front Vest
A women's cropped sleeveless vest with a shirt collar on a stand, front and back yokes, pleated patch pockets with flaps and a snap-fastened front placket. It ends in a bottom band with a tab on each side.
When To Wear
- Over a T-shirt, shirt or thin knit in spring and autumn.
- With high-waisted trousers, jeans or skirts, since it ends at the waist.
Key Design Features
Silhouette: Close-fitting, waist length; the back is shaped with darts.
Collar: Shirt collar on a separate stand, topstitched along the ends and outer edge.
Front: Centre front closure on separate interfaced plackets, fastened with snaps. The front yokes run at an angle down to the placket and are topstitched 0.5 cm from the seam.
Pockets: Patch pockets with a box pleat, under flaps that are caught into the front yoke seam. The flaps are topstitched and fasten with snaps.
Back: Cut on the fold, with a back yoke and back darts.
Waist: Interfaced bottom band cut on the fold; a topstitched tab is stitched onto the band at each side and fastens with a snap.
Finishing: Armholes finished with a 4 cm bias binding turned to the inside and topstitched along the fold.
Level Of Difficulty
Intermediate. A collar with a stand, box-pleated patch pockets, flaps set into a yoke seam, a separate front placket, bias-finished armholes and snap setting.
Fabric Recommendations
Suiting fabrics of natural or blended fibres.
Additional Supplies
- Fusible interfacing (collar, collar stand, flaps, front plackets, bottom band)
- 13 snaps
Cutter's Must
- From main fabric:
- Back - 1 piece on fold
- Back yoke – 1 piece
- Front yoke - 2 pieces
- Front – 2 pieces
- Collar – 2 pieces
- Collar stand – 2 pieces
- Pocket – 2 pieces
- Flap – 4 pieces
- Bottom placket – 1 piece on fold
- Front placket – 2 pieces
- Tab – 2 pieces
- From fusible interfacing:
- Collar – 1 piece
- Collar stand – 1 piece
- Flap – 2 pieces
- Front placket – 2 pieces
- Bottom placket – 1 piece
Sewing Instructions
When stitching pieces, pay attention to the notches - they must match!
- Fuse interfacing to the corresponding pieces.
- Stitch darts on the back. Press seam allowances towards the center.
- Place flap pieces right sides together in pairs and stitch the side and bottom edges. Trim seam allowances, turn right side out, and press. Topstitch along the bottom and side edges.
- Form and secure the box pleat on the pocket. Overlock the top edges of the pocket. Fold the top seam allowance to the wrong side, topstitch, and press. Overlock the bottom and side seam allowances of the pocket. Press the bottom and side seam allowances of the pocket to the wrong side and press. Topstitch the pocket onto the front according to the markings. Attach the front yoke to the front, inserting the flap. Overlock seam allowances and press upwards. Topstitch 0.5 cm from the seam to secure.
- Stitch the outer side of the front placket to the front. Press seam allowance towards the placket. Fold the placket to the wrong side, turn under the raw edge, and topstitch into the seam of the outer.
- Stitch shoulder seams, press seam allowances towards the back, and overlock.
- Place the upper collar and lower collar right sides together. Stitch the ends and outer edge of the collar. Trim seams. Turn the collar right side out, shape, and press. Topstitch along the ends and outer edge. Stitch the collar stand pieces, inserting the collar between them. Trim seam allowances, turn right side out, and press.
- Stitch the upper collar stand to the neckline of the garment. Fold the seam allowance of the lower collar stand to the wrong side and topstitch into the seam of the upper collar stand.
- Cut a bias binding 4 cm wide and length equal to the armhole length + 6 cm. Fold the bias binding in half lengthwise, right side out, and press. Place the binding with the armhole edge right sides together, extending the tails, and stitch. Fold the binding to the wrong side, clip seams, and topstitch along the fold onto the main piece. Press the seam.
- Stitch side seams, press seam allowances towards the back, and overlock.
- Fold the bottom placket piece in half lengthwise, right sides together, and stitch the side edges. Start and end the stitching precisely at the marked placket attachment seam line. Turn the piece right side out, press. Stitch the outer side of the placket to the bottom of the garment, fold the seam allowance of the inner side of the placket inwards, and topstitch into the seam of the outer placket.
- Fold the tab in half lengthwise, right sides together, and stitch the long and one short side. Trim seam allowances, turn right side out, and press. Topstitch along the finished sides. Fold the raw edge inwards and topstitch the tab onto the bottom placket according to the markings.
- Attach snaps according to the markings.