Professional made-to-measure digital sewing patterns — PDF · PLT · DXF AAMA

Minervainervabeta
#2052
#2054

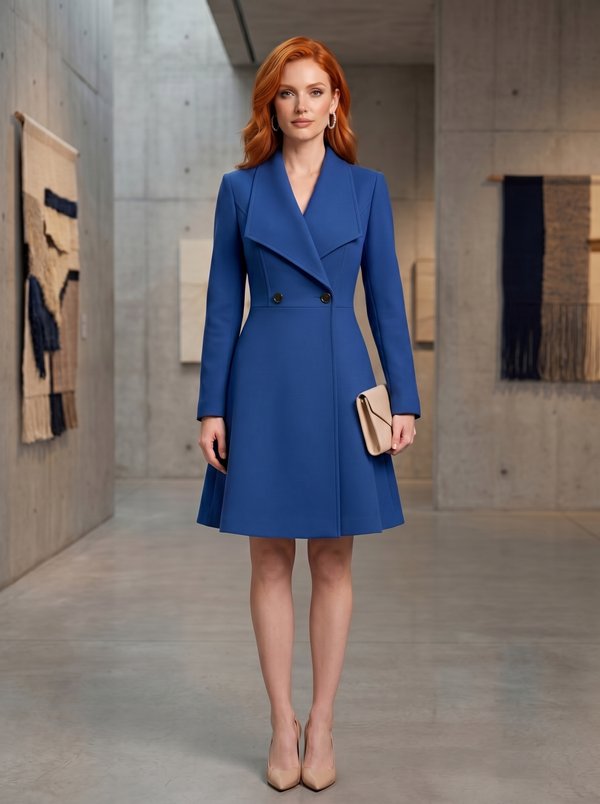
Double-Breasted A-Line Dress Three Quarter Sleeves

Pattern #2053

A knee-length women's coat dress with a collarless neckline, a double-breasted six-button front and three-quarter set-in sleeves. Princess seams at the front and back run into a flared skirt below a waist seam; fully lined. Drafted to your own measurements. Recommended fabric: light coat fabrics of natural or blended fibres: light wool coating, wool crepe, bouclé, tweed, heavy suiting.

Tech. Description

Double-Breasted Coat Dress with Flared Skirt & 3/4 Sleeves

A knee-length women's coat dress with a collarless neckline, a double-breasted six-button front and three-quarter set-in sleeves. Princess seams at the front and back run into a flared skirt below a waist seam; fully lined.

When To Wear

  • In spring and autumn as a dress for the office, meetings and daytime events.
  • With tights and ankle boots or pumps; it can also be worn open over a slim dress as a light coat.

Key Design Features

Silhouette: Fitted bodice, flared skirt; the princess seams continue from the bodice into the skirt.

Length: Knee length.

Neckline: Wide, collarless round neckline finished with front facings and a back neckline facing.

Sleeves: Three-quarter length, one-piece set-in sleeves with the cap eased into the armhole.

Front: Double-breasted, six buttons in three pairs on the bodice; buttonholes on both fronts, with inside buttons holding the underlap.

Back: Princess seams and a centre back seam through bodice and skirt.

Waist: Waist seam joining the upper and lower sections at front and back.

Finishing: Seams pressed open; front edges and neckline faced, with corners trimmed and curves clipped.

Lining: Full lining of body and sleeves, cut from the main pieces minus the facings; sewn to the hem and sleeve hems and turned through an opening in the left sleeve seam.

Level Of Difficulty

Intermediate. Matching princess seams across a waist seam, easing a sleeve cap, a faced double-breasted front and a fully bagged lining.

Fabric Recommendations

Light coat fabrics of natural or blended fibres: light wool coating, wool crepe, bouclé, tweed, heavy suiting.

Additional Supplies

  • Lining fabric
  • Fusible interfacing (front facings, back neckline facing, upper and lower centre front)
  • Main buttons (six on the drawing)
  • Inside buttons (3 flat)
  • Small shoulder pads and sleeve heads

Cutter’s Must

From Main Fabric:

  1. Upper Center Back – 2 pieces
  2. Upper Side Back – 2 pieces
  3. Lower Center Back – 2 pieces
  4. Lower Side Back – 2 pieces
  5. Center Front – 2 pieces
  6. Side Front – 2 pieces
  7. Lower Center Front – 2 pieces
  8. Lower Side Front – 2 pieces
  9. Sleeve – 2 pieces
  10. Back Neckline Facing – 1 piece
  11. Center Front Facing – 2 pieces

From Lining Fabric:

From the lining, cut the below pieces using the main patterns with the following modifications:

  1. Upper Center Back – exclude Back Neckline Facing area, cut 2.
  2. Upper Side Back – exclude Back Neckline Facing area, cut 2.
  3. Lower Center Back – cut 2.
  4. Lower Side Back – cut 2.
  5. Upper Front Lining – 2 pieces.
  6. Lower Center Front - exclude Center Front Facing area, cut 2.
  7. Lower Side Front – cut 2.
  8. Sleeve – cut 2.

From Fusible Interfacing:

  1. Back Neckline Facing – 1 piece
  2. Front Facing – 2 pieces
  3. Upper Center Front – 2 pieces
  4. Lower Center Front – 2 pieces

Important Information

Before cutting your fabric:

  • Print and lay out pattern pieces to determine yardage.
  • Check mirrored pieces, notches, and grainlines.
  • For patterned fabrics, align carefully for symmetry.

Assembly Instructions

Preparation

Fuse Interfacing

From the wrong side, apply fusible interfacing to Back Neckline Facing, Front Facings, Upper and Lower Center Front pieces - Press thoroughly with a hot iron and press cloth until fully bonded.

Back Assembly

  1. Stitch upper side back pieces to upper center back; press seam allowances open.
  2. Stitch lower side back pieces to lower center back; press seam allowances open.
  3. Join upper and lower back sections together, aligning seams; press allowances open.

Front Assembly

  1. Stitch upper side front pieces to upper center front; press allowances open.
  2. Stitch lower side front pieces to lower center front; press allowances open.
  3. Join upper and lower front sections together; press allowances open.

Main Body Assembly

  1. Join shoulder seams; press open.
  2. Stitch side seams; press allowances open.

Sleeves

  1. Stitch sleeve seams; press allowances open.
  2. Ease sleeve caps between notches and set sleeves into armholes, distributing ease evenly.
  3. Stitch and press seam allowances toward sleeves.

Facings

  1. Join shoulder seams of Front Facings and Back Neck Facing; press allowances open.
  2. With right sides together, stitch facings to the coat along the front edges and neckline.
  3. Clip curves, trim corners, turn right side out, and press for a clean edge.

Lining Assembly

  1. Assemble lining in the same order as the main garment, leaving a 20 cm opening in the left sleeve seam for turning.
  2. Attach lining to the facings along the front edges and neckline.
  3. Press neckline seam toward lining.

Hem & Sleeves

  1. Stitch lining to coat hem and sleeve hems, ensuring lining is 2 cm shorter to form an ease pleat.
  2. Turn the coat right side out through the sleeve opening.
  3. Close the opening neatly by hand or machine stitch.

Finishing

  1. Work buttonholes on both fronts as marked.
  2. Sew main and inside buttons.
  3. Give the garment a final press, shaping the neckline and sleeve heads on a tailor’s ham.

Features

Order Pattern

Standard Sizes

Individual Measurements

Please double-check the file format and paper size. Your pattern is drafted in exactly the format you select; a different format or paper size later is a new order.

Similar patterns

View all
Support

Minerva Support

Online
Support
Hi! I'm Minerva's AI assistant. What can I help you with?