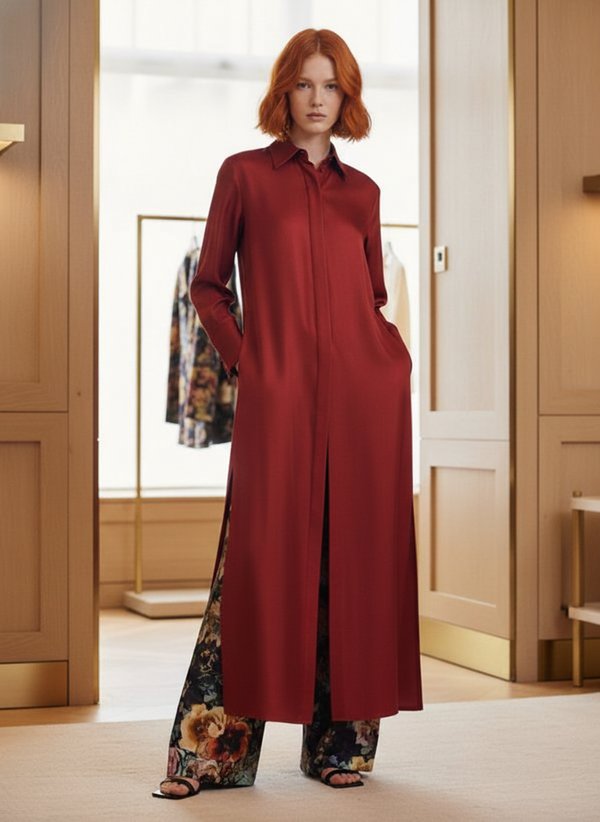
Relaxed Shirt with Snap Side Openings
A women's long-sleeved shirt with a straight relaxed body and open sides: front and back are joined only at the armholes, and the faced side edges overlap and fasten with snaps. Collar on a stand, cut-on front placket, back yoke and buttoned cuffs.
When To Wear
- Over trousers or jeans for everyday wear in spring and summer.
- Over a fitted top or slip dress, so the open sides show the layer underneath.
Key Design Features
Silhouette: Straight, relaxed fit, hip length or slightly longer.
Collar: Shirt collar on a separate stand, topstitched 0.1 cm from the edge; the stand closes with a button.
Front: Button front with a cut-on placket topstitched from the right side; the lower edge of each front is shaped.
Sleeves: Long set-in sleeves with a slit at the wrist reinforced by stitching 0.1 cm from the edge, and a one-piece cuff with a button.
Back: Back yoke; the back is cut in one piece on the fold and hangs below the front at the sides.
Closure: No side seams. The side edges of the front and back are finished with facings, overlap, and are secured with snaps; the pieces are stitched together only along the armhole edge.
Finishing: Back hem overlocked, turned in and topstitched; shoulder seams pressed towards the back.
Level Of Difficulty
Intermediate. Collar and stand, cuffs, a cut-on placket with a stitched corner, and faced open side edges.
Fabric Recommendations
Light to medium-weight shirting fabrics: cotton poplin, chambray, linen, viscose.
Additional Supplies
- Fusible interfacing (collar, collar stand, cuffs)
- Buttons (front, collar stand, cuffs)
- Snaps (side edges of front and back)
Cutter's Must
- From main fabric:
- Back yoke - 1 piece
- Back - 1 piece on fold
- Front - 2 pieces
- Front facing – 2 pieces
- Back facing – 2 pieces
- Collar - 2 pieces
- Collar stand - 2 pieces
- Sleeve - 2 pieces
- Cuff - 2 pieces
- From fusible interfacing:
- Collar - 1 piece
- Collar stand - 1 piece
- Cuff – 2 pieces
Sewing Instructions
- Fuse interfacing to the designated pieces.
- Stitch the back yoke to the back. Overlock the seam allowances and press them upwards. Place the back facing onto the back, right sides together. Stitch the side edge. Fold the facing to the wrong side, fold the outer allowance inwards and topstitch along the marked line. Overlock the bottom edge of the back. Fold the allowance inwards and topstitch.
- Place the front facing onto the front, right sides together. Stitch the side edge. Fold the facing to the wrong side, fold the outer allowance inwards and topstitch along the marked line. Fold the outer edge of the integrated placket inwards and press. Fold the integrated front placket to the right side and stitch the bottom corner. Trim the allowance at the corner, turn the placket to the wrong side. Fold the placket allowance inwards and topstitch along the marked line from the right side.
- Place the side edge of the front onto the side edge of the back, aligning the plackets and secure the pieces along the armhole edge.
- Stitch the shoulder seams, press allowances towards the back and overlock.
- Fold the upper collar with the undercollar, right sides together. Stitch the ends and the outer edge of the collar. Trim the seams. Turn the collar right side out, shape and press. Fold the collar stand pieces right sides together, insert the prepared collar between them, align the notches and stitch, simultaneously stitching the ends of the collar stand. Start and end the stitching strictly at the marked line of the collar stand attachment seam. Turn the finished collar right side out and press.
- Stitch the outer collar stand with the collar to the neckline, fold under the open edge of the inner collar stand and topstitch into the attachment seam. Stitch a decorative seam along the collar and collar stand at 0.1 cm.
- Overlock the sleeve edges separately. Stitch the sleeve edge from the mark upwards, press allowances open. Stitch a reinforcing seam along the slit at 0.1 cm from the edge. Stitch the sleeves into the armholes. Overlock the allowances and press them towards the sleeve.
- Fold the cuff in half lengthwise, right sides together, and stitch the side edges. Turn the piece right side out, press. Stitch the outer side of the cuff to the sleeve, fold the allowance of the inner side of the cuff inwards and topstitch into the seam of the outer cuff attachment.
- Make buttonholes and sew buttons onto the front, collar stand, and cuffs. Sew buttons according to the buttonholes. Attach snaps to the side edges of the front and back.