Professional made-to-measure digital sewing patterns — PDF · PLT · DXF AAMA

Minervainervabeta
#4940
#4942

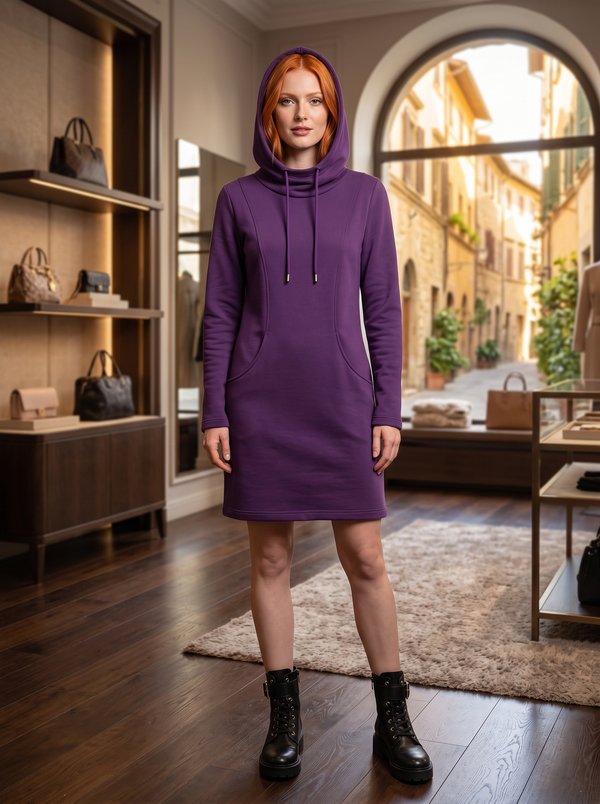
Hooded Sweatshirt

Pattern #4941

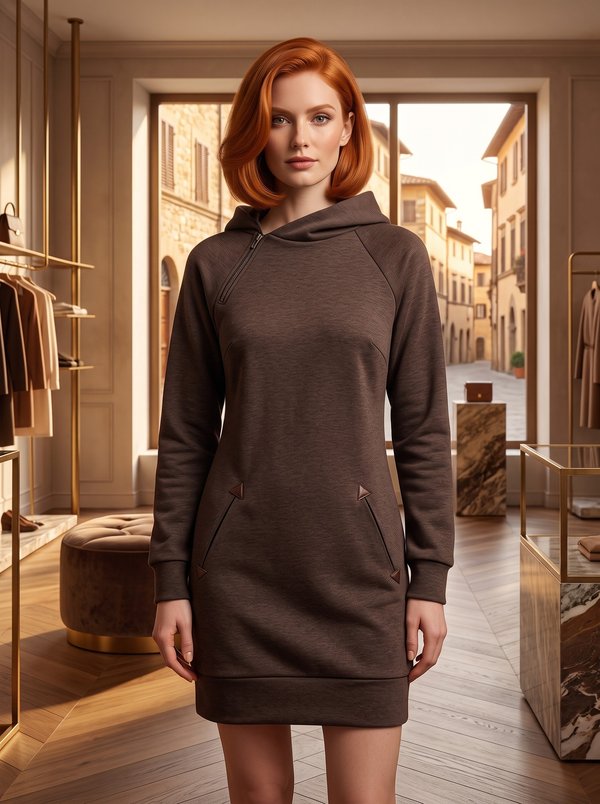
A women's hip-length pullover sweatshirt in knit fabric, with raglan sleeves topped by a shoulder yoke, a front divided by curved panel seams, vertical welt pockets and a double-layer crossover hood with a drawstring. Drafted to your own measurements. Recommended fabric: knit fabric with low stretch, from natural or blended fibres.

Tech. Description

Hooded Sweatshirt

A women's hip-length pullover sweatshirt in knit fabric, with raglan sleeves topped by a shoulder yoke, a front divided by curved panel seams, vertical welt pockets and a double-layer crossover hood with a drawstring.

When To Wear

  • Over a T-shirt or long-sleeve top on cool days in spring and autumn.
  • With jeans, joggers or leggings for walks, travel and sport.

Key Design Features

Silhouette: Straight pullover with a relaxed fit, gathered in by a hem band and cuffs.

Length: Hip length.

Collar: Hood cut in two layers (outer and inner, four pieces), with the right side lapped over the left at the front neck. A drawstring casing is topstitched along the front edge; the cord comes out through two eyelets and is held by cord stoppers.

Sleeves: Raglan sleeves with a yoke joined to the top of the sleeve; long, finished with a double-layer cuff.

Front: Centre front cut on the fold with curved panel seams to the side fronts; seam allowances pressed toward the centre.

Pockets: Vertical off-set welt pockets on the side fronts, the welt ends topstitched, with pocket bags inside.

Back: One piece cut on the fold, with no centre back seam.

Finishing: Double-layer hem band; seams sewn with a stretch or narrow zigzag stitch and overlocked, raglan and panel seam allowances pressed to one side.

Level Of Difficulty

Intermediate. Welt pockets in knit fabric, a two-layer crossover hood with eyelets and a drawstring casing, raglan sleeves with a yoke, bands stretched to fit.

Fabric Recommendations

Knit fabric with low stretch, from natural or blended fibres. Ready-made ribbing can be used for the cuffs and hem band.

Additional Supplies

  • 2 eyelets
  • 2 cord stoppers
  • Decorative cord for the hood

Cutter’s Must

From Main Fabric:

  1. Back – 1 piece on fold
  2. Center Front – 1 piece on fold
  3. Side Front – 2 pieces
  4. Yoke – 2 pieces
  5. Hood – 4 pieces
  6. Off-Set Welt – 2 pieces
  7. Sleeve – 2 pieces
  8. Cuff – 2 pieces
  9. Placket (hem band) – 1 piece on fold
  10. Pocket Bag – 4 pieces

Important Information

Before cutting your fabric:

  • Print and lay out pattern pieces to determine yardage.
  • Check mirrored pieces, notches, and grainlines.
  • For patterned fabrics, align carefully for symmetry.

Assembly Instructions

1. Pocket Welt

  • Fold the off-set welt lengthwise in half, right sides together, and stitch across the ends.
  • Turn the welt right side out, shape the corners neatly, and press.
  • Place the welt on the side front according to the markings and topstitch its ends.

2. Pocket Bags

  • Attach the pocket bags at the pocket opening according to the pattern markings.

3. Front Panel Seams

  • Stitch the center front to the side fronts.
  • Press seam allowances toward the center and overlock.

4. Sleeve Yoke

Stitch the yoke to the sleeve, press seam allowances toward the yoke, and overlock.

5. Sleeve and Body Assembly

  • Attach the sleeves to the back; press seam allowances toward the back and overlock.
  • Attach the sleeves to the front; press seam allowances toward the front and overlock.

6. Side and Sleeve Seams

  • Stitch the side seams together with the sleeve seams in one continuous line.
  • Press seam allowances and overlock.

7. Hood

  • Stitch the hood pieces in pairs.
  • On the outer hood, set the eyelets at the marked positions.
  • Place the two hoods right sides together and stitch around the outer edge.
  • Clip seam allowances along curved areas, turn right side out, shape, and press.
  • Topstitch along the marked line to form a drawstring casing.
  • Overlap the right hood over the left and baste or stitch together along the lower edge.

8. Attach Hood

  • Sew the hood into the neckline.
  • Press seam allowances upward and overlock.

9. Cuffs

  • Stitch each cuff into a ring and press seam allowances open.
  • Fold the cuff in half lengthwise, wrong sides together, and press.
  • Attach the cuff to the sleeve hem, slightly stretching it to match.
  • Press seam allowances upward and overlock.

10. Lower Band

  • Stitch the placket (hem band) into a ring and press seam allowances open.
  • Fold the band in half lengthwise, wrong sides together, and press.
  • Attach the band to the garment’s lower edge, stretching it evenly.
  • Press seam allowances upward and overlock.

11. Finishing

Thread the cord through the hood casing and secure the cord stoppers.

Tip: Ready-made ribbed cuffs and waistband can also be used instead of self-fabric pieces.

Order Pattern

Standard Sizes

Individual Measurements

Please double-check the file format and paper size. Your pattern is drafted in exactly the format you select; a different format or paper size later is a new order.

Similar patterns

View all
Support

Minerva Support

Online
Support
Hi! I'm Minerva's AI assistant. What can I help you with?