Long Asymmetric Vest
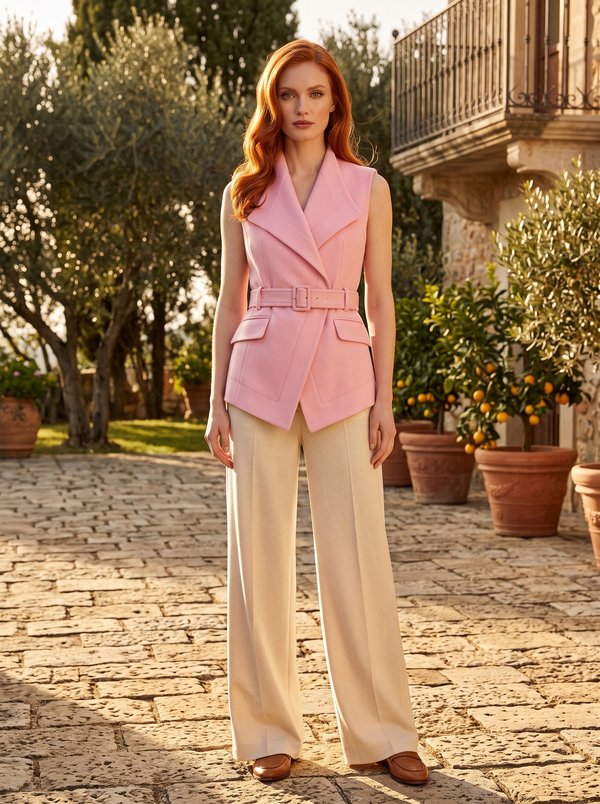
A women's long sleeveless vest with a notched collar and lapels, a wrap-over front with a diagonal edge on the lower part, a waist band with a buckle at the side, and a patch pocket with a buttoned flap. Lined.
When To Wear
- Over a blouse or fine knit top with trousers.
- In spring and autumn as a layer over long-sleeved tops.
Key Design Features
Silhouette: Fitted bodice with princess seams front and back, joined at the waist to a lower part that falls straight to the hem.
Length: Mid-thigh.
Collar: Notched collar with lapels; the under collar is set into the neckline, the upper collar into the facings.
Front: Wrap-over front; the right and left lower fronts are cut differently, the overlapping one with a diagonal front edge.
Closure: A buttonhole on the left band and an inner button hold the wrap; a small strap with a buckle is sewn into the side seam of the band.
Pockets: One patch pocket on the lower front with an inverted pleat and a flap with a button, edges topstitched at 0.2 and 0.5 cm.
Back: Centre back seam and princess seams in the bodice; the lower back is cut on the fold.
Waist: Interfaced waist band in two layers between bodice and lower part, topstitched at 0.2 and 0.5 cm.
Lining: Bodice and lower part lined; armholes finished with the lining.
Level Of Difficulty
Intermediate. A notched collar set between garment and facings, a lined sleeveless bodice with armholes stitched in two steps, a pleated patch pocket with flap, and a two-layer waist band with a buckle strap.
Fabric Recommendations
Dress fabrics of natural or blended fibres.
Additional Supplies
- Lining fabric
- Fusible interfacing (centre fronts, front facings, collar, back neck facing, waist band)
- Buckle
- 2 buttons
Cutter's Must
If the patterns have a double contour, they include seam allowances. If the contour is single, the patterns do not include seam allowances. Seam allowances: all seams 1 cm. Attention! First of all, print out the paper patterns and lay them out on the fabric width (fabric width can be from 90 cm to 150 cm) to determine how much material you will need (do not forget to account for paired and symmetrical pieces).
Sewing Instructions
When stitching pieces, pay attention to the notches – they must match!
- Fuse interfacing to the Center Fronts, the Center Front Facings, one Collar piece (upper collar), the Back Neckline Facing and one Right Waistband and one Left Waistband.
- Stitch the back princess seams (Center Back to Side Back), press the seam allowances towards the centre. Stitch the centre back seam and press the seam allowances open.
- Stitch the front princess seams (Center Front to Side Front), press the seam allowances towards the centre.
- Stitch the shoulder and side seams of the vest bodice, press the seam allowances open.
- Place the upper collar on the under collar, right sides together, and stitch along the ends and the outer edge. Start and end the stitching exactly at the marked collar attachment line. Trim the seam allowances at the corners, clip at the mark. Turn the collar right side out, ease out the edges and press.
- Stitch the shoulder seams of the Center Front Facings and the Back Neckline Facing, press the seam allowances open.
- Place the Center Front Facing on the Center Front, right sides together, pin and stitch along the front edge and the lapel, up to the notch that marks the end of the collar attachment. Trim the seam allowances at the corners. Turn the front edges right side out and ease out the seams.
- Stitch the under collar to the neckline of the vest, and the upper collar to the neckline edge of the Back Neckline Facing and Center Front Facings. Press the collar seam allowances open and stitch them together close to the seam.
- Sew the lining seams. Stitch the lining to the Back Neckline Facing and the Center Front Facings. Stitch the armholes of the vest and lining together in two steps: first the front armhole, then the back armhole.
- Fold and tack the inverted pleat on the Pocket. Overlock the top edge of the Pocket. Fold the top edge allowance to the inside and topstitch. Fold the remaining Pocket allowances to the wrong side and press. Place the Pocket on the lower front along the marks and topstitch. Topstitch along the side and lower edges at 0.2 and 0.5 cm. Place the two Flap pieces right sides together and stitch along the lower and side edges. Trim the seam allowances and the corners, turn right side out and press. Topstitch at 0.2 and 0.5 cm. Make a buttonhole on the flap. Place the flap right side down on the right side of the lower front and stitch it 1 cm above the pocket. Fold the flap down and topstitch it with two rows at 0.2 and 0.5 cm.
- Stitch the side seams of the lower part (Back Skirt to Right Front Skirt and Left Front Skirt). Press the seam allowances open. Stitch the side seams of the lower lining in the same way and press them open. Place the lining on the lower part, right sides together, and stitch along the hem and the front edges. Trim the corners, turn right side out and press.
- Overlock the top and bottom edges of the Smaller Waistband, fold them to the inside and topstitch. Thread the buckle onto it and tack its ends together. Stitch the side seam of the outer waistband (Right Waistband to Left Waistband), inserting the buckle strap. Press the seam allowances open. Stitch the side seam of the inner waistband and press the seam allowances open. Stitch the outer waistband to the upper and lower parts of the vest. Press the seam allowances towards the waistband. Place the upper edges of the outer and inner waistbands right sides together (with the upper part of the vest between them) and stitch. Turn the inner waistband down and press. Stitch across the free ends of the waistband. Trim the seam allowances and turn right side out. Fold under the lower allowance of the inner waistband and stitch it in the ditch of the outer waistband seam. Topstitch at 0.2 and 0.5 cm.
- Make a buttonhole on the Left Waistband. Sew on the inner button. Sew the button on the pocket.