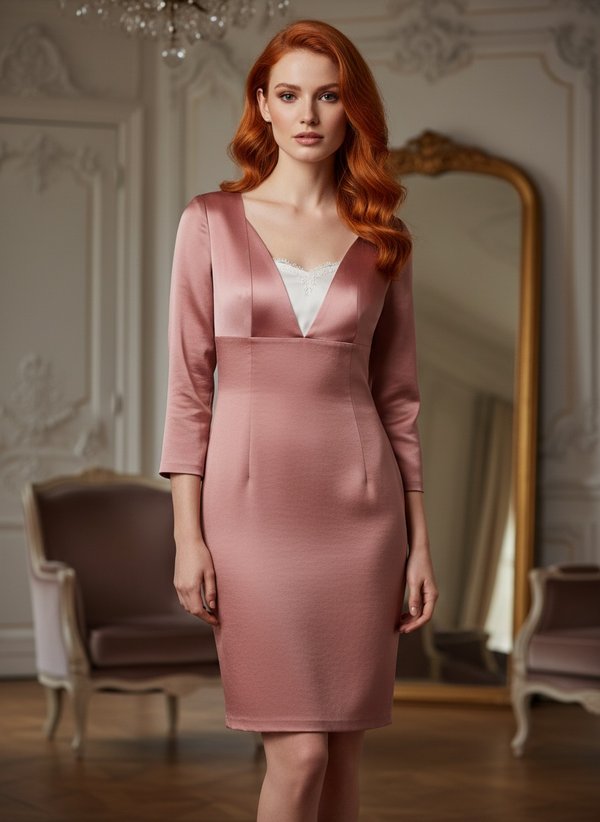
Notched Collar Sweetheart Bodice Sheath Dress
A knee-length women's sheath dress with an under-bust seam and princess seams at front and back. The front bodice has a sweetheart neckline with ruched centre panels, framed by a notched collar and lapels cut from crepe-satin. Short set-in sleeves, an invisible zip in the left side seam and a back vent.
When To Wear
- At the office in spring and summer, on its own or under a jacket.
- Daytime celebrations, theatre and dinners.
Key Design Features
Silhouette: Fitted sheath, shaped by princess seams above and below the under-bust seam at front and back.
Length: Knee length, hem blind-stitched by hand.
Neckline: Sweetheart. The upper edge of the upper centre fronts is serged, turned under and topstitched; their centre edges are gathered and joined by a narrow strap folded in half, creating ruching at the centre front.
Collar: Notched collar and lapels in crepe-satin, interfaced and topstitched. The lapels are sewn to the collar along the break line and set into the seam between the upper centre front and the upper side front.
Sleeves: Short, set-in, hem turned up and topstitched.
Closure: Invisible zip in the left side seam.
Back: Centre back seam; upper back with darts and princess seams, lower back in centre and side panels, with an interfaced vent at the centre back hem.
Level Of Difficulty
Advanced. A notched collar with separately attached lapels set into a princess seam, gathered panels joined by a strap, a back vent and an invisible zip, plus 20 pieces to match.
Fabric Recommendations
Fine suiting or dress fabrics of natural or blended fibres; crepe-satin for the collar and lapels.
Additional Supplies
- Crepe-satin for the collar and lapels
- Fusible interfacing (under collar, lapels, vent)
- Invisible zip
Cutter's Must
- From main fabric:
- Upper Center Back – 2 pieces
- Upper Side Back – 2 pieces
- Lower Center Back – 2 pieces
- Lower Side Back – 2 pieces
- Upper Center Front – 2 pieces
- Upper Side Front – 2 pieces
- Lower Center Front – 1 piece
- Lower Side Front – 2 pieces
- Sleeve – 2 pieces
- Strap – 1 piece
- From crepe satin:
- Collar – 2 pieces
- Lapel – 4 pieces
- From fusible interfacing:
- Collar – 1 piece
- Lapel – 2 pieces
Sewing Instructions
- Fuse interfacing to the under collar and the Lapels.
- Stitch the darts on the upper back pieces. Press the darts towards the center. Stitch the center back seam of the Upper Center Back pieces, press seam allowances to the left and serge.
- Stitch the princess seams on the upper back, press seam allowances towards the center and serge.
- Stitch shoulder seams, press seam allowances towards the back and serge.
- Serge the upper edge of the upper center front, press to the wrong side and topstitch. Along the center edge, run a line of long, loose stitches and gather. Press the Strap in half crosswise, right side out. Stitch the Strap to one Upper Center Front, press the seam allowances towards the front and serge. Stitch the Strap to the other Upper Center Front, stitching exactly over the existing seam. Press seam allowances towards the front and serge.
- Place the upper and under Collar right sides together and stitch along the outer edge and the notch (gorge) line. Clip the seam near the “o” notch. Turn the collar right side out and press. Place the Lapel pieces right sides together and stitch along the outer edge and gorge line up to the notch. Clip the seam near the gorge notch, turn the lapels right side out and press. Stitch the upper and under collar separately to the lapels along the break line. Press seam allowances open.
- Place the finished collar with lapels on the upper part of the dress and stitch: from the lower edge of the Upper Side Front to the “o-” notch, then clip the upper collar, fold it back and stitch only the under collar into the neckline up to the “o-” notch on the other front. Clip the upper collar seam allowance and, from the notch, stitch both collar layers again.
- Along the princess seam of the upper center front, stitch with loosely tensioned stitches and gather. Stitch the Upper Center Front to the Upper Side Front from the bottom to the “o-” notch (the lapel is between them). Clip seam allowances, press towards the side seam and serge.
- Press the collar attachment seam allowances towards the collar. Turn under the open inner edge of the collar and topstitch into the collar attachment seam. Secure the collar and lapels along the break line. Topstitch along the collar and lapel.
- On both Lower Center Back pieces, fuse interfacing to the vent from the wrong side. On the right side, mark the center seam line (vent fold line). Serge the center seam of the back separately on each piece, serging the vent simultaneously. Stitch the center seam of the back from the upper edge to the vent edge. Clip the corner of the vent seam allowance on the right piece. Press the center seam seam allowances, pressing the vent. Press the right side of the vent 1 cm to the wrong side and topstitch. Press the vent allowances to the left side and machine-stitch across the top of the vent.
- Stitch the princess seams on the lower back, press seam allowances towards the center and serge. Stitch the princess seams on the lower front, press seam allowances towards the center and serge.
- Stitch the upper and lower back parts, press seam allowances upwards and serge. Stitch the upper and lower front parts, press seam allowances downwards and serge.
- Stitch the right side seam, press seam allowances towards the back and serge. Serge the left side seams separately. Stitch the left side seam from the armhole to the upper notch and from the lower notch to the hem. Insert the invisible zipper between the notches.
- Stitch the sleeve seam. Press seam allowances and serge. Set the sleeves into the armholes, aligning the notches. Press seam allowances and serge. Serge the lower edge of the sleeve, press to the wrong side and topstitch.
- Serge the hem allowance of the dress, press to the wrong side and hem with blind stitches.