Notched Collar Dress with Wrap Bodice
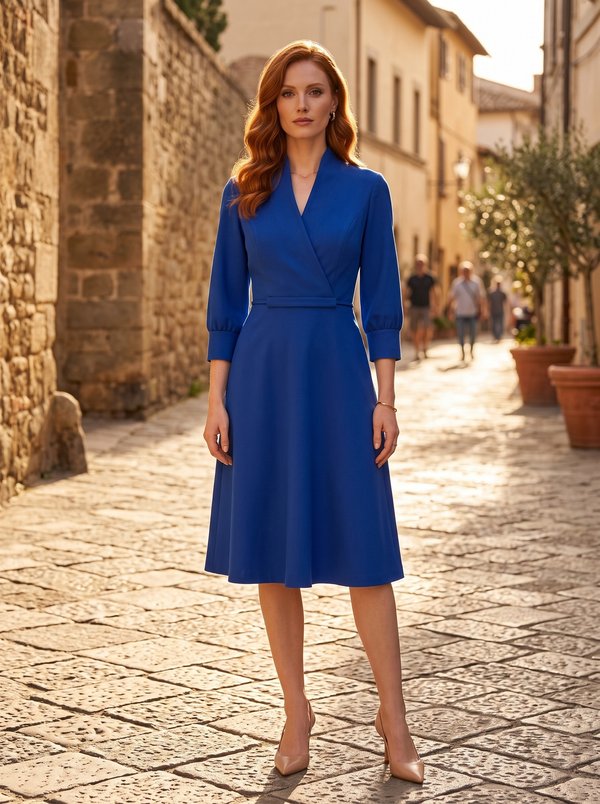
A women's below-the-knee dress with a crossover bodice, a large collar with separate lapels, a wide shaped waistband fastened with three buttons and rouleau loops, and a full flared skirt. Two-piece sleeves end in turn-back cuffs.
When To Wear
- At the office and for business meetings in spring and autumn.
- For daytime celebrations and lunches, with court shoes or heeled boots.
Key Design Features
Silhouette: Fitted bodice shaped by princess seams front and back, wide waistband, full flared skirt.
Length: Below the knee.
Collar: Large pointed collar with separate lapels set between the front and the facing; the collar is held to the dress with buttons.
Sleeves: Two-piece set-in sleeves with an eased cap, below elbow length, finished with folded cuffs turned back onto the right side.
Front: Crossover V-neck bodice with cut-on facings. The right front waistband closes with three buttons and bias rouleau loops; an inner snap holds the underlap.
Waist: Wide waistband on front and back, with the bodice and skirt seams pressed onto it.
Skirt: Front skirt in two parts joined by a centre front seam; back skirt cut in one piece on the fold.
Back: Centre back cut on the fold with princess-seamed side backs; back neckline facing.
Finishing: Hem overlocked, turned up 2 cm and topstitched.
Level Of Difficulty
Intermediate. Collar and lapels inserted between the front and facing, princess seams, rouleau loops, two-piece sleeves with an eased cap and shaped cuffs.
Fabric Recommendations
Lightweight suiting fabrics from natural or blended fibres.
Additional Supplies
- Fusible interfacing (collar, lapels, front facings, back neckline facing, cuffs)
- 5 buttons
- 1 snap fastener
Cutter's Must
- From main fabric:
- Center back - 1 piece with fold
- Side back - 2 pieces
- Back waistband - 1 piece
- Back skirt - 1 piece with fold
- Center front - 2 pieces
- Side front - 2 pieces
- Right front waistband - 1 piece
- Left front waistband - 1 piece
- Inner front waistband - 1 piece
- Right front skirt - 1 piece
- Left front skirt - 1 piece
- Collar – 2 pieces
- Lapel – 4 pieces
- Front facing - 2 pieces
- Back neckline facing – 1 piece
- Upper sleeve – 2 pieces
- Lower sleeve – 2 pieces
- Cuff – 2 pieces
- From fusible interfacing:
- Collar – 1 piece
- Lapel - 2 pieces
- Front facing - 2 pieces
- Back neckline facing – 1 piece
- Cuff – 2 pieces
Sewing Instructions
- Stitch the princess seams of the upper back, press seam allowances towards the center and overlock.
- Attach the back waistband to the upper, press seam allowances onto the waistband and overlock. Attach the back skirt to the waistband, press seam allowances onto the waistband and overlock.
- Stitch the princess seams of the upper front, press seam allowances towards the center and overlock.
- Stitch shoulder seams, press seam allowances towards the back and overlock.
- Fold collar pieces wrong sides together and stitch along the ends and outer edge. Trim seams at corners, clip curves. Turn collar right side out, shape and press.
- Fold lapel pieces wrong sides together and stitch along the outer edge. Trim seams at corners, clip curves. Turn lapel right side out, shape and press.
- Stitch shoulder seams of front facings and back neckline facing, press seam allowances open. Overlock the outer edge.
- Fold front facing with front right sides together and stitch along the front edge, inserting the collar and lapels between the pieces. Turn front edges right side out, shape and press.
- Cut a bias strip 3 cm wide and 15 cm long. Fold the strip in half lengthwise and stitch 0.3 cm from the fold. Trim seam allowances and turn the piece right side out. Cut the rouleau into three parts, adjust loop length.
- Stitch the right front waistband to the inner waistband, inserting the rouleau loops, press seam allowances and overlock. Stitch the right skirt to the waistband, press seam allowances onto the waistband and overlock. Stitch the left skirt to the waistband, press seam allowances onto the waistband and overlock. Stitch the center front skirt seam, press seam allowances open and overlock.
- Attach the right upper front to the waistband, press seam allowances onto the waistband and overlock. Attach the left upper front to the waistband, press seam allowances onto the waistband and overlock. Press the unworked seam allowance of the front waistband to the wrong side and topstitch.
- Stitch side seams, press seam allowances towards the back and overlock.
- Stitch and press open the elbow and front sleeve seams. Set sleeves into armholes according to notches, easing the sleeve cap.
- Fold the cuff in half lengthwise right sides together and stitch the ends from the fold to the mark. Trim seam allowances at the corner, clip at the mark. Fold the cuff into a loop and stitch the sections from the mark to the edge. Turn cuff right side out, shape, press. Fold cuff with the wrong side of the sleeve, align the seam on the cuff with the mark and attach to the lower edge, press seam allowances and overlock. Turn cuff to the right side.
- Overlock the bottom edge of the garment, press to the wrong side and topstitch.
- Sew buttons corresponding to the rouleau loops. Sew the inner snap. Sew buttons to the collar, securing it to the dress.