Professional made-to-measure digital sewing patterns — PDF · PLT · DXF AAMA

Minervainervabeta
#5357
#5359

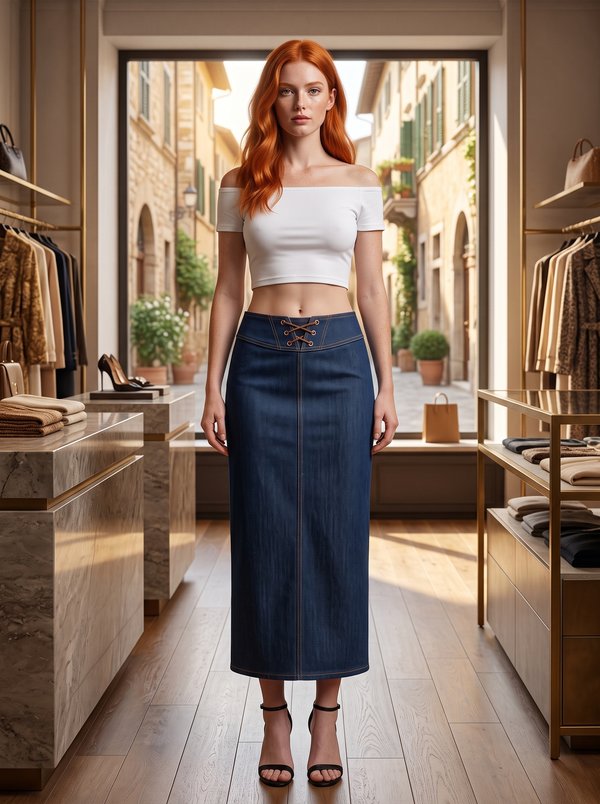
Panelled Mermaid Skirt with Lace-Up Back

Pattern #5358

A women's maxi skirt in denim, fitted through the hips and thighs and flaring below the knee, made of curved vertical panels with topstitched seams. It fastens at the centre back with a lace-up opening: a cord laced through eyelets over an underlap. Drafted to your own measurements. Recommended fabric: denim.

Tech. Description

Panelled Mermaid Skirt with Lace-Up Back

A women's maxi skirt in denim, fitted through the hips and thighs and flaring below the knee, made of curved vertical panels with topstitched seams. It fastens at the centre back with a lace-up opening: a cord laced through eyelets over an underlap.

When To Wear

  • With fitted tops, shirts or short jackets in spring and autumn.
  • For evenings out and summer events when a long denim skirt is wanted.

Key Design Features

Silhouette: Mermaid: close-fitting over the hips and thighs, widening from the knee to the hem.

Length: Maxi, to the ankle.

Front: A centre front panel, two curved inserts and a side panel on each side, joined by princess seams that run from the waist to the hem.

Back: The same panel arrangement plus a centre back seam, stitched up to a notch; above it, a lace-up opening with a row of eyelets on each edge.

Closure: Lacing at the centre back over an interfaced underlap; the right back edge is faced.

Waist: No waistband; the top edge is finished with interfaced facings understitched 0.2 cm from the seam.

Finishing: All princess seams pressed open and topstitched 0.5 cm on each side; 2 cm hem, overlocked and topstitched.

Level Of Difficulty

Intermediate. Long curved princess seams that have to match at the notches, even topstitching along every seam, a faced waist with an underlap, and setting eyelets.

Fabric Recommendations

Denim.

Additional Supplies

  • Fusible interfacing (front facing, fastener facings, underlap)
  • Eyelets
  • Cord for lacing

Cutter's Must

From main fabric:

  • 1. Center Back Skirt – 2 pieces
  • 2. Back Skirt Inset 1 – 2 pieces
  • 3. Back Skirt Inset 2 – 2 pieces
  • 4. Side Skirt – 4 pieces
  • 5. Center Front Skirt – 1 piece
  • 6. Front Skirt Inset 1 – 2 pieces
  • 7. Front Skirt Inset 2 – 2 pieces
  • 8. Front Skirt Facing – 1 piece
  • 9. Button Catch (underlap) – 1 piece
  • 10. Closure Facing – 2 pieces
  • From fusible interfacing: Closure Facing, Button Catch, Front Skirt Facing.

Sewing Instructions

  1. Fuse interfacing to the Closure Facings, the Button Catch and the Front Skirt Facing.
  2. Stitch the princess seams of the front, joining the Side Skirt, Front Skirt Inset 2, Front Skirt Inset 1 and the Center Front Skirt. Overlock the seams, press them and topstitch 0.5 cm from the seams.
  3. Stitch the princess seams of the back, joining the Side Skirt, Back Skirt Inset 2, Back Skirt Inset 1 and the Center Back Skirt. Overlock the seams, press them and topstitch 0.5 cm from the seams.
  4. Stitch the side seams joining the front and the back. Overlock and press the side seams.
  5. Overlock the centre back edges and stitch the centre back seam up to the notch. Press the centre back seam open.
  6. Fold the Button Catch in half and stitch across the upper and lower ends. Turn it right side out and press.
  7. Stitch the side seams joining the Front Skirt Facing and the Closure Facings and press them open. Overlock the outer edge of the facings.
  8. Place the facings on the upper edge of the skirt, right sides together, and stitch along the upper edge of the skirt and down the right centre back edge. Press the seam allowances onto the facings and understitch 0.2 cm from the seam. Trim and turn the right corner. Turn the facings to the wrong side and press the upper edge of the skirt.
  9. Overlock the long side edge of the Button Catch. Stitch the Button Catch to the other centre back edge. Turn under the centre edge of the Closure Facing and topstitch it in the Button Catch seam.
  10. Overlock the hem allowance, turn it up and topstitch. Press the hem.
  11. Mark and set the eyelets.

Features

Order Pattern

Standard Sizes

Individual Measurements

Please double-check the file format and paper size. Your pattern is drafted in exactly the format you select; a different format or paper size later is a new order.

Similar patterns

View all
Support

Minerva Support

Online
Support
Hi! I'm Minerva's AI assistant. What can I help you with?