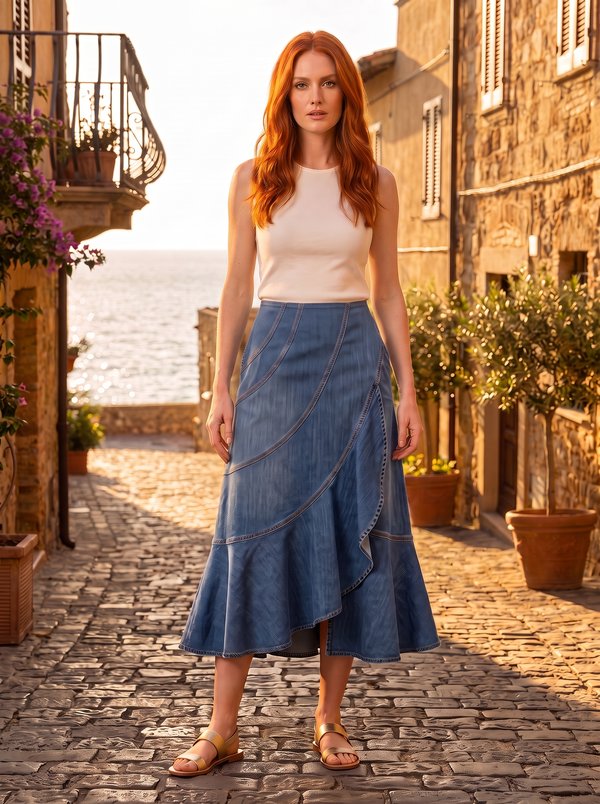
Asymmetrical Paneled Wrap Skirt
A long women's skirt with a wrap front buttoned at the waistband, built from curved and angled panels. Every panel seam is pressed open and topstitched 0.2 cm from the seam; the overlapping front panel ends in a diagonal, asymmetric hem edge.
When To Wear
- In autumn and spring with a tucked-in blouse, a fine sweater or a short jacket.
- With ankle boots or flat shoes, which suit its length.
Key Design Features
Silhouette: Slightly flared from hip to hem, length to mid-calf.
Front: Right and left fronts are each cut in several parts; the right front adds a side wedge and a central wedge at the hem. Curved seams sweep across the upper front towards the side, and the wrap edge runs straight from the waistband to the hem, then turns into an angled hem line.
Closure: Wrap front, fastened with a button and buttonhole at the waistband.
Back: A three-part upper back with two vertical seams, a curved diagonal seam below it, and a horizontal seam across the lower back.
Waist: Straight waistband folded in half, with the ends stitched and turned; hanging loops are inserted into the waistband seam.
Finishing: All panel seams pressed open and topstitched 0.2 cm from the seam.
Level Of Difficulty
Intermediate. Fourteen skirt panels joined along curved seams, precise notch matching and even topstitching on every seam.
Fabric Recommendations
Faux suede.
Additional Supplies
Cutter's Must
- From main fabric:
- 1. Left upper back – 1 piece
- 2. Right upper back – 1 piece
- 3. Upper central back – 1 piece
- 4. Right middle back – 1 piece
- 5. Middle back – 1 piece
- 6. Lower back – 1 piece
- 7. Lower right front - 1 piece
- 8. Side wedge of right front – 1 piece
- 9. Central wedge of right front – 1 piece
- 10. Upper right front - 1 piece
- 11. Middle right front – 1 piece
- 12. Upper left front – 1 piece
- 13. Middle left front – 1 piece
- 14. Lower left front – 1 piece
- 15. Waistband – 1 piece
Sewing Instructions
- Stitch the side edges of the side and central wedges of the right front and press open the seam allowances. Topstitch at a distance of 0.2 cm from the joining seam.
- Attach the lower right front to the stitched wedges, press open the seam allowances. Topstitch at a distance of 0.2 cm from the joining seam.
- Attach the middle right front to the lower front, press open the seam allowances. Topstitch at a distance of 0.2 cm from the joining seam.
- Attach the upper front to the middle front, press open the seam allowances. Topstitch at a distance of 0.2 cm from the joining seam.
- Attach the middle left front to the lower left front, press open the seam allowances. Topstitch at a distance of 0.2 cm from the joining seam.
- Attach the upper right front, press open the seam allowances. Topstitch at a distance of 0.2 cm from the joining seam.
- Attach the middle back to the lower back, press open the seam allowances. Topstitch at a distance of 0.2 cm from the joining seam.
- Attach the right middle back to the middle back, press open the seam allowances. Topstitch at a distance of 0.2 cm from the joining seam.
- Stitch the side edges of the upper central back and the left upper back, press open the seam allowances. Topstitch at a distance of 0.2 cm from the joining seam.
- Stitch the side edges of the upper central back and the right upper back, press open the seam allowances.
- Attach the stitched upper back to the middle back. Topstitch at a distance of 0.2 cm from the joining seam.
- Stitch and press open the side seams of the back and front.
- Fold the waistband in half with the wrong side in and press in half. Stitch the side edges of the waistband, trim, turn out, and press the waistband. Place the finished waistband with the outer on the right side of the skirt, aligning the edges, and attach, matching the notches on the waistband with the side seams on the skirt, simultaneously inserting the hangers. Topstitch the inner of the waistband into the waistband joining seam.
- Make buttonholes and sew on buttons.