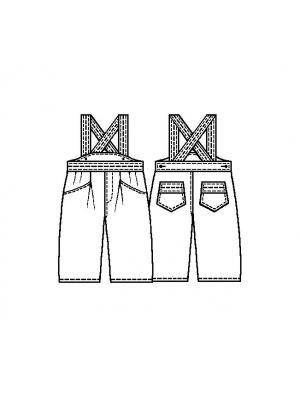
Children's Loose Bib Overalls
Introducing a comfortable children's bib overall pattern featuring a relaxed silhouette, practical pockets, and adjustable shoulder straps, designed for ease of wear and active play.
When To Wear
These loose bib overalls are perfect for active children, offering comfort and durability for:
- Playtime & Outdoor Activities: Provides freedom of movement and withstands active play due to its durable construction.
- Casual Everyday Wear: a versatile and comfortable choice for daily outfits, easily paired with various tops.
- Comfort-focused Apparel: Ideal for relaxed settings where ease and a non-restrictive fit are prioritized.
Key Design Features
Silhouette: Relaxed fit through the torso and legs, designed for comfort and ease of movement.
Bib: a classic rectangular bib front, integrated with adjustable shoulder straps.
Straps: Adjustable shoulder straps, designed to cross at the back and secure to the front bib with button closures for a customizable fit.
Pockets: Practical slanted entry pockets at the front and two patch pockets on the back.
Closure: Side seam zipper closure for easy dressing.
Waist: Slightly gathered or pleated detail at the front waist, attaching the bib section to the trousers for a comfortable fit.
Hem: Straight leg hem for a classic finish.
Level Of Difficulty
Intermediate. Requires skills in zipper insertion, various pocket construction, creating darts/pleats, and attaching hardware for adjustable straps.
Fabric Recommendations
Choose durable woven fabrics with some body for these overalls:
- Cotton canvas
- Denim
- Twill
- Corduroy
Additional Supplies
- Zipper (length dependent on garment size)
- 4 metallic buttons, 16mm diameter
Sewing Instructions
- Note: Decorative topstitching should be done with yellow thread.
- Place the pocket bag, turned downwards, onto the front with right sides together and stitch along the pocket opening; press the pocket bag to the wrong side of the garment and sew a double decorative stitch along the fold.
- Place the side onto the stitched pocket bag with right sides together, aligning the bottom edges, and stitch the side and pocket bag; overlock the seam allowances.
- Baste the side to the front along the side edges.
- From the wrong side of the garment, stitch the dart of the front, press in the indicated direction, and sew a horizontal stitch along the bottom with a frequent small zigzag, 1 cm long.
- Fold the darts along the waist edge of the side according to the markings, press in the indicated direction, and baste along the edges.
- Finish the side closure edge with a machine hem, press the closure allowance to the wrong side of the garment along the outermost dashed line and baste along the top and bottom edges; finish the bottom edge of the closure allowance with a zigzag stitch.
- Press the upper pocket hem of the back inwards, turn under the edge, and stitch along the edge; sew a decorative zigzag stitch 1 cm below the hem stitching line.
- Stitch the side seams up to the closure mark and overlock the seam allowances.
- Stitch the inseams and overlock the seam allowances.
- Stitch the center seam of the jumpsuit up to the closure mark from the front side, overlock the seam allowances, press to the left side, and sew a double decorative stitch.
- Install the "zipper with integrated facing" - From the right closure allowance, cut off excess fabric, leaving 1 cm for the extension and 1 cm for the seam.
- Pin the "zipper", turned sideways, to the right closure edge, place the facing, folded in half with the wrong side inwards, on top, aligning the edges, and stitch all layers; straighten the facing and sew a securing stitch along the edge of the "zipper".
- Press the left integrated facing inwards according to the markings and stitch the second side of the "zipper".
- Overlock the seam allowances and stitch the left facing to the main garment.
- From the wrong side, sew a securing zigzag stitch along the bottom edges of the facings and sew a decorative stitch along the front edge of the closure; close the "zipper" and baste the right and left front panels along the waist edge.
- Fold the strap in half lengthwise with right sides together and stitch along the long and one short edge; turn right side out, press, and sew decorative stitches 5 mm from the edges and a large zigzag stitch in the middle.
- Trim the open edge of the strap at an angle and pin the straps, turned downwards at an angle (considering their future crossing), from the right side to the upper edge of the back waistband at a distance of 4.5 cm from the center line.
- Place the back waistband pieces with right sides together and stitch along the side and upper edges, attaching the straps; turn right side out and press.
- Press the bottom edges of the back waistband inwards, insert the top of the back panels between them, and stitch all layers along the edge; sew a decorative stitch along the entire contour of the back waistband.
- Place the bodice pieces with right sides together, stitch along the upper and side edges; turn right side out and press.
- Place the bodice, turned downwards, from the right side onto the waist edge of the front panels and stitch the outer bodice piece to the main garment; press the bodice upwards, turn under the bottom edge of the inner bodice piece, and stitch with a double stitch to the main garment, continuing the decorative double stitch along the entire perimeter of the bodice.
- Sew a decorative zigzag 2 cm above the bodice attachment to the main garment.
- Press the hem of the jumpsuit bottom inwards, turn under the edge, and stitch with a double stitch.
- Make buttonholes on the bodice and on the back waistband according to the markings.
- Sew on the buttons.
- Cross the straps on the back at a distance of 10.5 cm from the waistband and stitch into the "seam" with decorative topstitching.