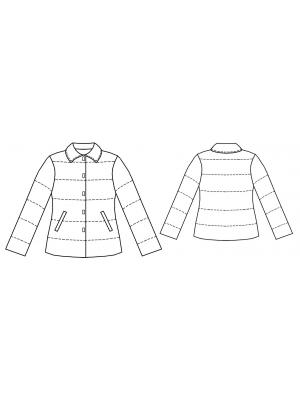
Quilted Collared Button-Front Jacket
Introducing a versatile girls' sewing pattern for a quilted, collared jacket, designed with a classic button-front closure and practical welt pockets.
When To Wear
This jacket offers comfortable and stylish wear for various occasions, making it an excellent choice for:
- Everyday Casual: Ideal for daily school wear, outings, or relaxed weekend activities.
- Transitional Weather: Perfect as a light outer layer during spring, autumn, or cooler summer evenings.
- Layering Style: Versatile for layering over sweaters or long-sleeved tops for added warmth and style.
Key Design Features
Silhouette: a comfortable, slightly relaxed straight silhouette, allowing for easy movement and layering.
Neckline & Collar: Features a sharp, pointed shirt collar creating a classic neckline.
Closure: a practical full-length button-front placket provides secure closure and traditional styling.
Sleeves: Long, straight set-in sleeves finish with a simple hem, suitable for rolling up or wearing down.
Pockets: Functional welt pockets with a visible welt strip are placed at the front, offering convenient storage.
Quilting: Horizontal quilting lines are visible throughout the body and sleeves, indicating a padded construction for warmth and texture.
Back: a clean, unadorned back panel with horizontal quilting mirrors the front design.
Hem: a straight bottom hem ensures a neat and tidy finish to the jacket.
Level Of Difficulty
Intermediate. This pattern involves techniques such as quilting, constructing welt pockets with a welt strip, and precise lining insertion.
Fabric Recommendations
Choose outerwear fabrics with some body and structure, suitable for quilting and light weather protection:
- Raincoat fabrics
- Coated or impregnated fabrics
- Nylon blends
- Water-resistant poplin
Additional Supplies
- Synthetic wadding
- Fusible interfacing
- Velcro tape
Cutter's Must
- From main fabric:
- 1. Back - 1 piece on fold
- 3. Facing - 2 pieces
- 4. Pocket bag – 2 pieces
- 5. Front - 2 pieces
- 7. Under facing - 2 pieces
- 8. Collar - 2 pieces
- 9. Sleeve - 2 pieces
- From lining fabric:
- 2. Back - 1 piece on fold
- 6. Front - 2 pieces
- 10. Sleeve - 2 pieces
- From syntepon: reinforce back, front, sleeve, and upper collar pieces with syntepon, stitching them according to markings.
Sewing Instructions
- Reinforce facings with fusible interfacing (Heat-activated interfacings are ironed onto the wrong side of the piece with a hot iron).
- On the side parts of the front panels, create welt pockets with facing: press facings in half lengthwise, right sides out.
- On the wrong side of the front, iron a strip of interfacing about 2 cm wide over the pocket marking.
- Place the pocket facing and pocket bag from the main fabric onto the front, right sides together, pin along the pocket opening marking and stitch, ensuring that the longitudinal edges of the facing and pocket bag align with the center of the pocket marking.
- Cut the front lengthwise between the stitching lines, diagonally towards the ends of the stitching lines. Be careful not to damage the facings and pocket bags!
- Press seam allowances open. Turn facings and pocket bags through the slit to the wrong side and baste.
- On the wrong side of the front, place the lower pocket bag on the facing, directing the pocket bag upwards, and from the right side, topstitch the facing into the attachment seam, catching the pocket bag. Press the pocket bag downwards.
- Turn the small triangles at the ends of the slit to the wrong side and stitch them together with the ends of the facing, precisely from the ends of the upper stitching line to the ends of the lower.
- Trim pocket bags, evening them out, and stitch.
- Stitch the side and shoulder seams of the jacket.
- Fold the lower and upper collars right sides together and stitch along the ends and outer edge. Turn the collar to the right side, straighten the corners, and press.
- Stitch sleeve seams. Set sleeves into armholes.
- Press the bottom of the garment and sleeves to the wrong side.
- Stitch lining pieces together, leaving a technological opening in one of the sleeve seams for turning.
- Attach under facings to the lining.
- Place the lining and main garment right sides together and stitch along all edges, inserting the collar between the necklines of the lining and the main garment.
- Turn the jacket to the right side, stitch the technological opening closed.
- Neatly sew the bottom of the sleeve lining to the hem.
- On the right front, topstitch hook-and-loop tape pieces according to markings; on the left front – with pile.